


PrestaShop shipping: how to set it up in your online store
Have you just finished setting up your PrestaShop store and are having some trouble setting up shipping?
In this article you'll find everything you need to get up and running in just a few minutes.
You'll find the general logic behind the settings and a step-by-step guide to configuring all the parameters you need to make your first shipment.
If you're already familiar with the platform and want to know more about a specific setting, you can click on the table of contents below and jump straight to the section you're interested in.
PrestaShop shipping: general configuration
PrestaShop shipping: how to set up shipping zones
PrestaShop shipping: creating a new zone
PrestaShop shipping: adding states to a zone
PrestaShop shipping: setting up carriers
PrestaShop carriers: general settings
PrestaShop carriers: destinations and shipping costs
PrestaShop carriers: size, weight and access groups
PrestaShop carriers: summary
PrestaShop shipping: general settings
PrestaShop shipping: carrier modules
PrestaShop shipping: the complete Sendcloud solution
PrestaShop shipping: general configuration
PrestaShop is a well-designed platform. Despite the level of sophistication of the services it offers, all the settings are pretty intuitive and grouped together in a very practical way.
You won't be forced to jump from one menu to another like on other platforms.
The logic behind the shipping settings works like this:
First, you need to create your shipping zones. Then you can select which states to include in each zone.
Once the zones are set up, you can move on to creating the various carriers and assigning them to one or more zones.
PrestaShop shipping: how to set up shipping zones
The first thing to do is click on "International" in the left-hand menu and then click "Location".
This will take you to the screen below, from which you can manage zones and assign states.
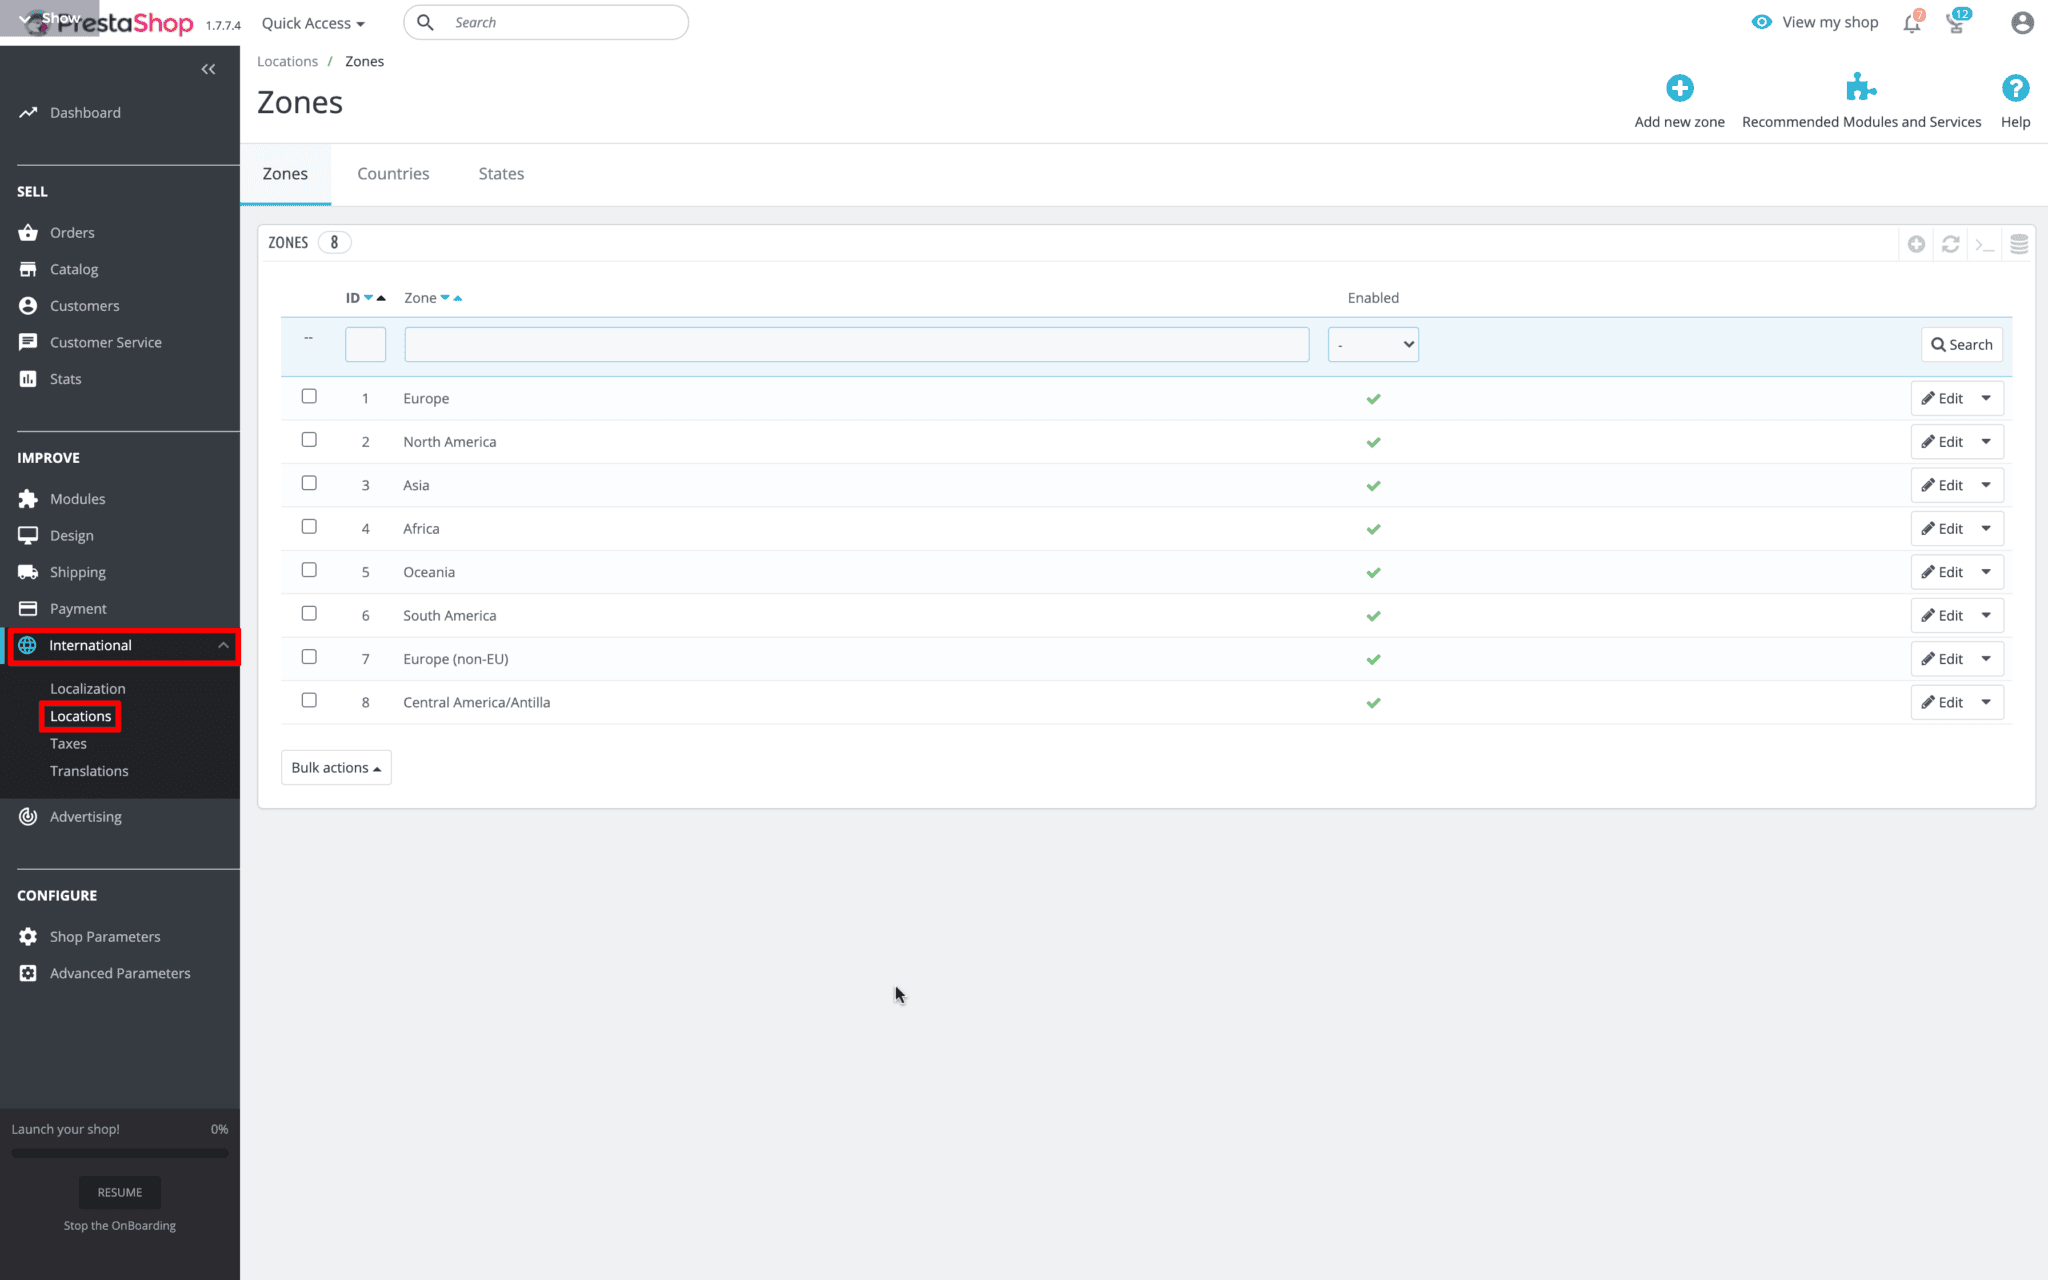
The first time, you'll find some zones already preset by PrestaShop.
It's up to you to decide whether it's worth keeping and editing them, or whether you'd rather delete everything and start from scratch.
Either way, creating a new zone is really simple. Let's see how right away.
PrestaShop shipping: creating a new zone
The first thing to do to create a new zone is click "Add new zone".
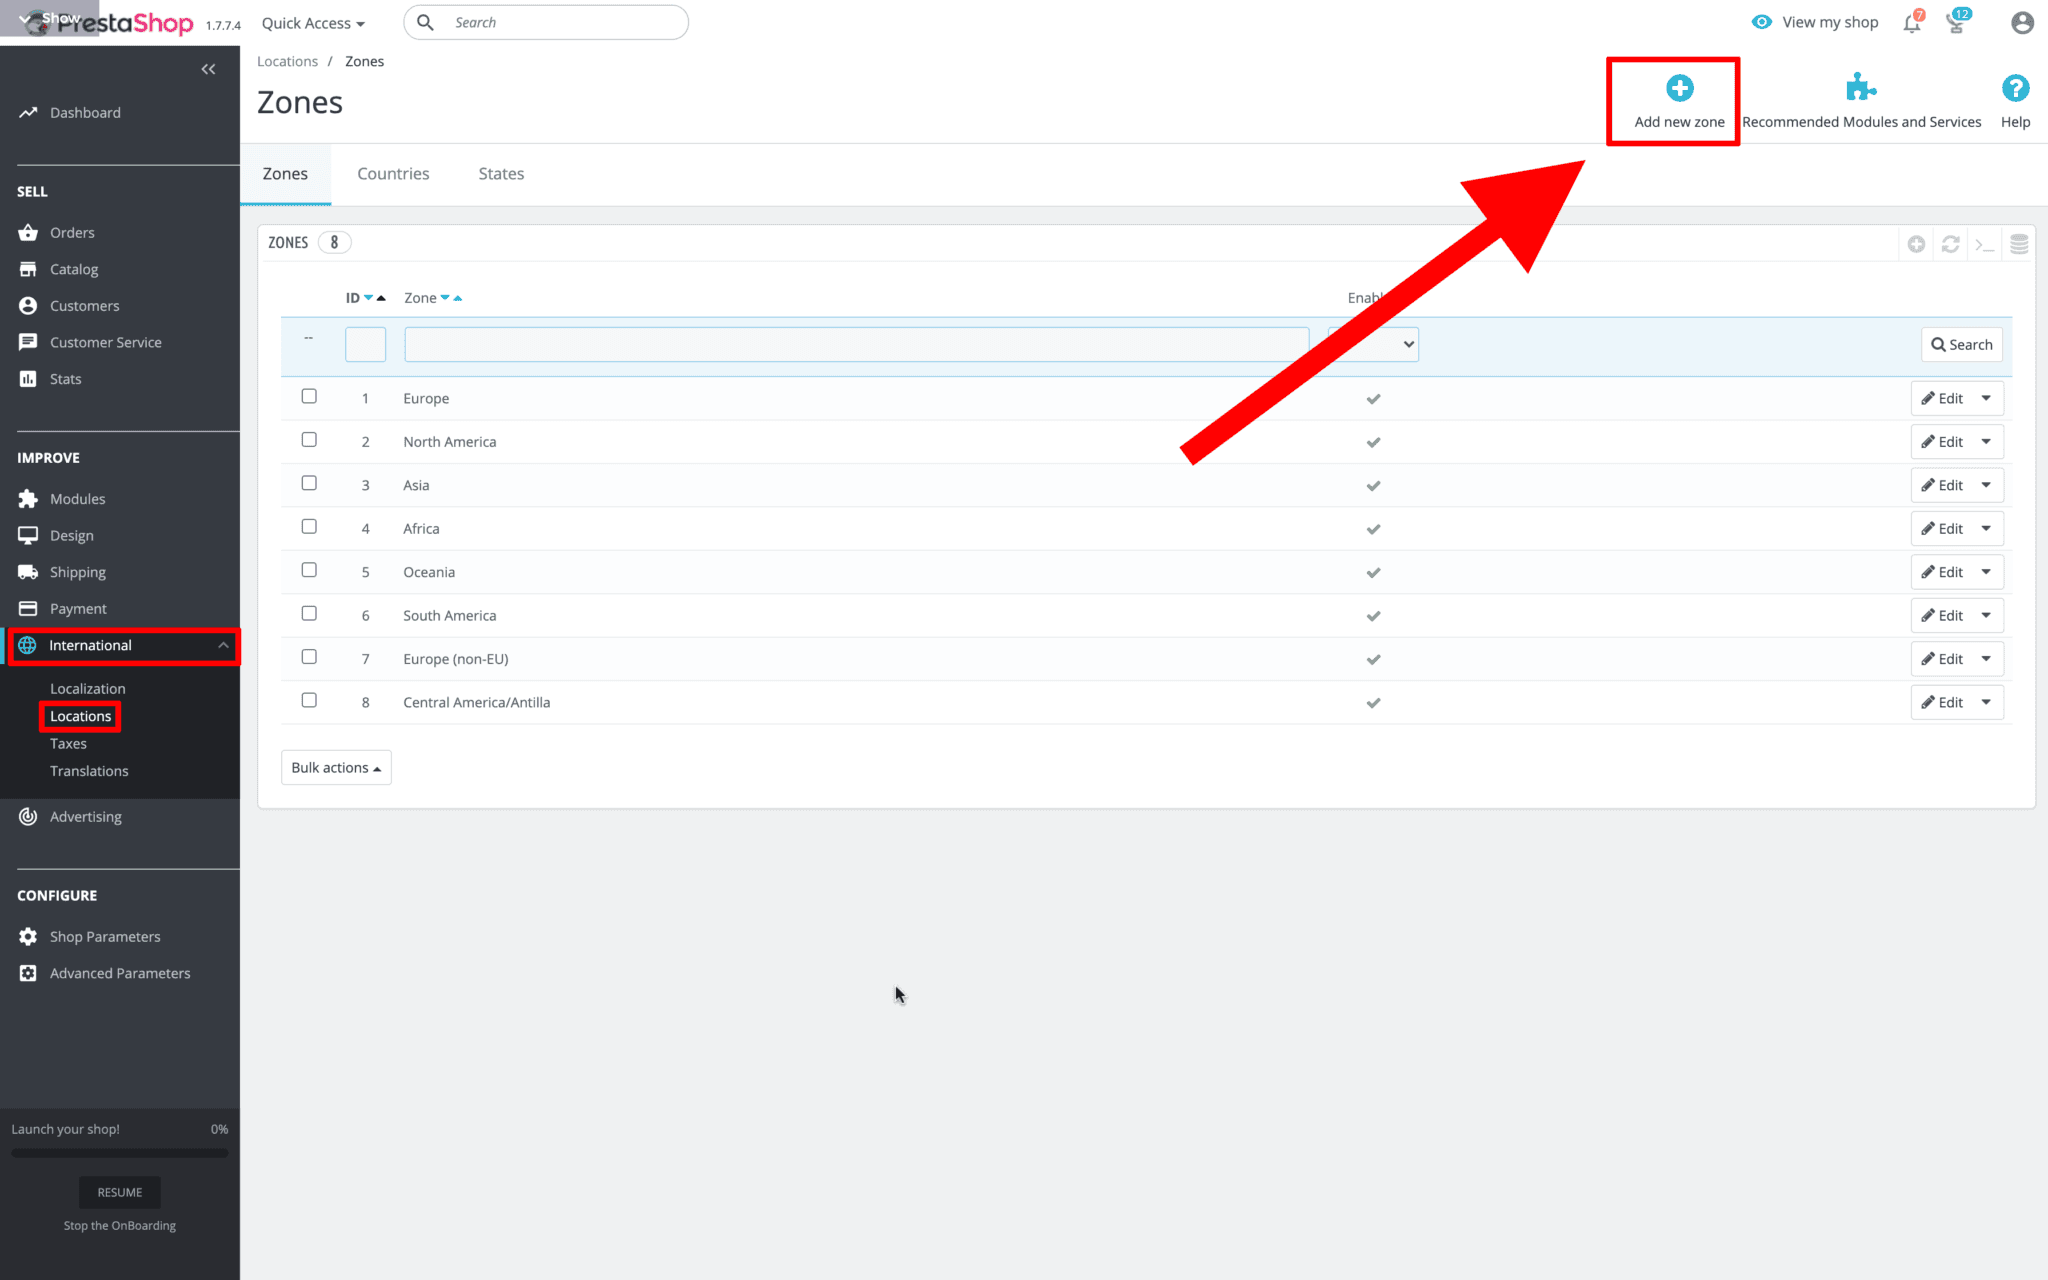
This will open the screen where you enter the name of the zone.
The zone name won't be visible to your customers, so you can name it however you prefer.
A good approach is to use your shipping options as a reference.
For example, if you use different shipping services for different countries, you can use the continent name as the main reference and add the names of the various countries you'll ship to with the same carrier in brackets.
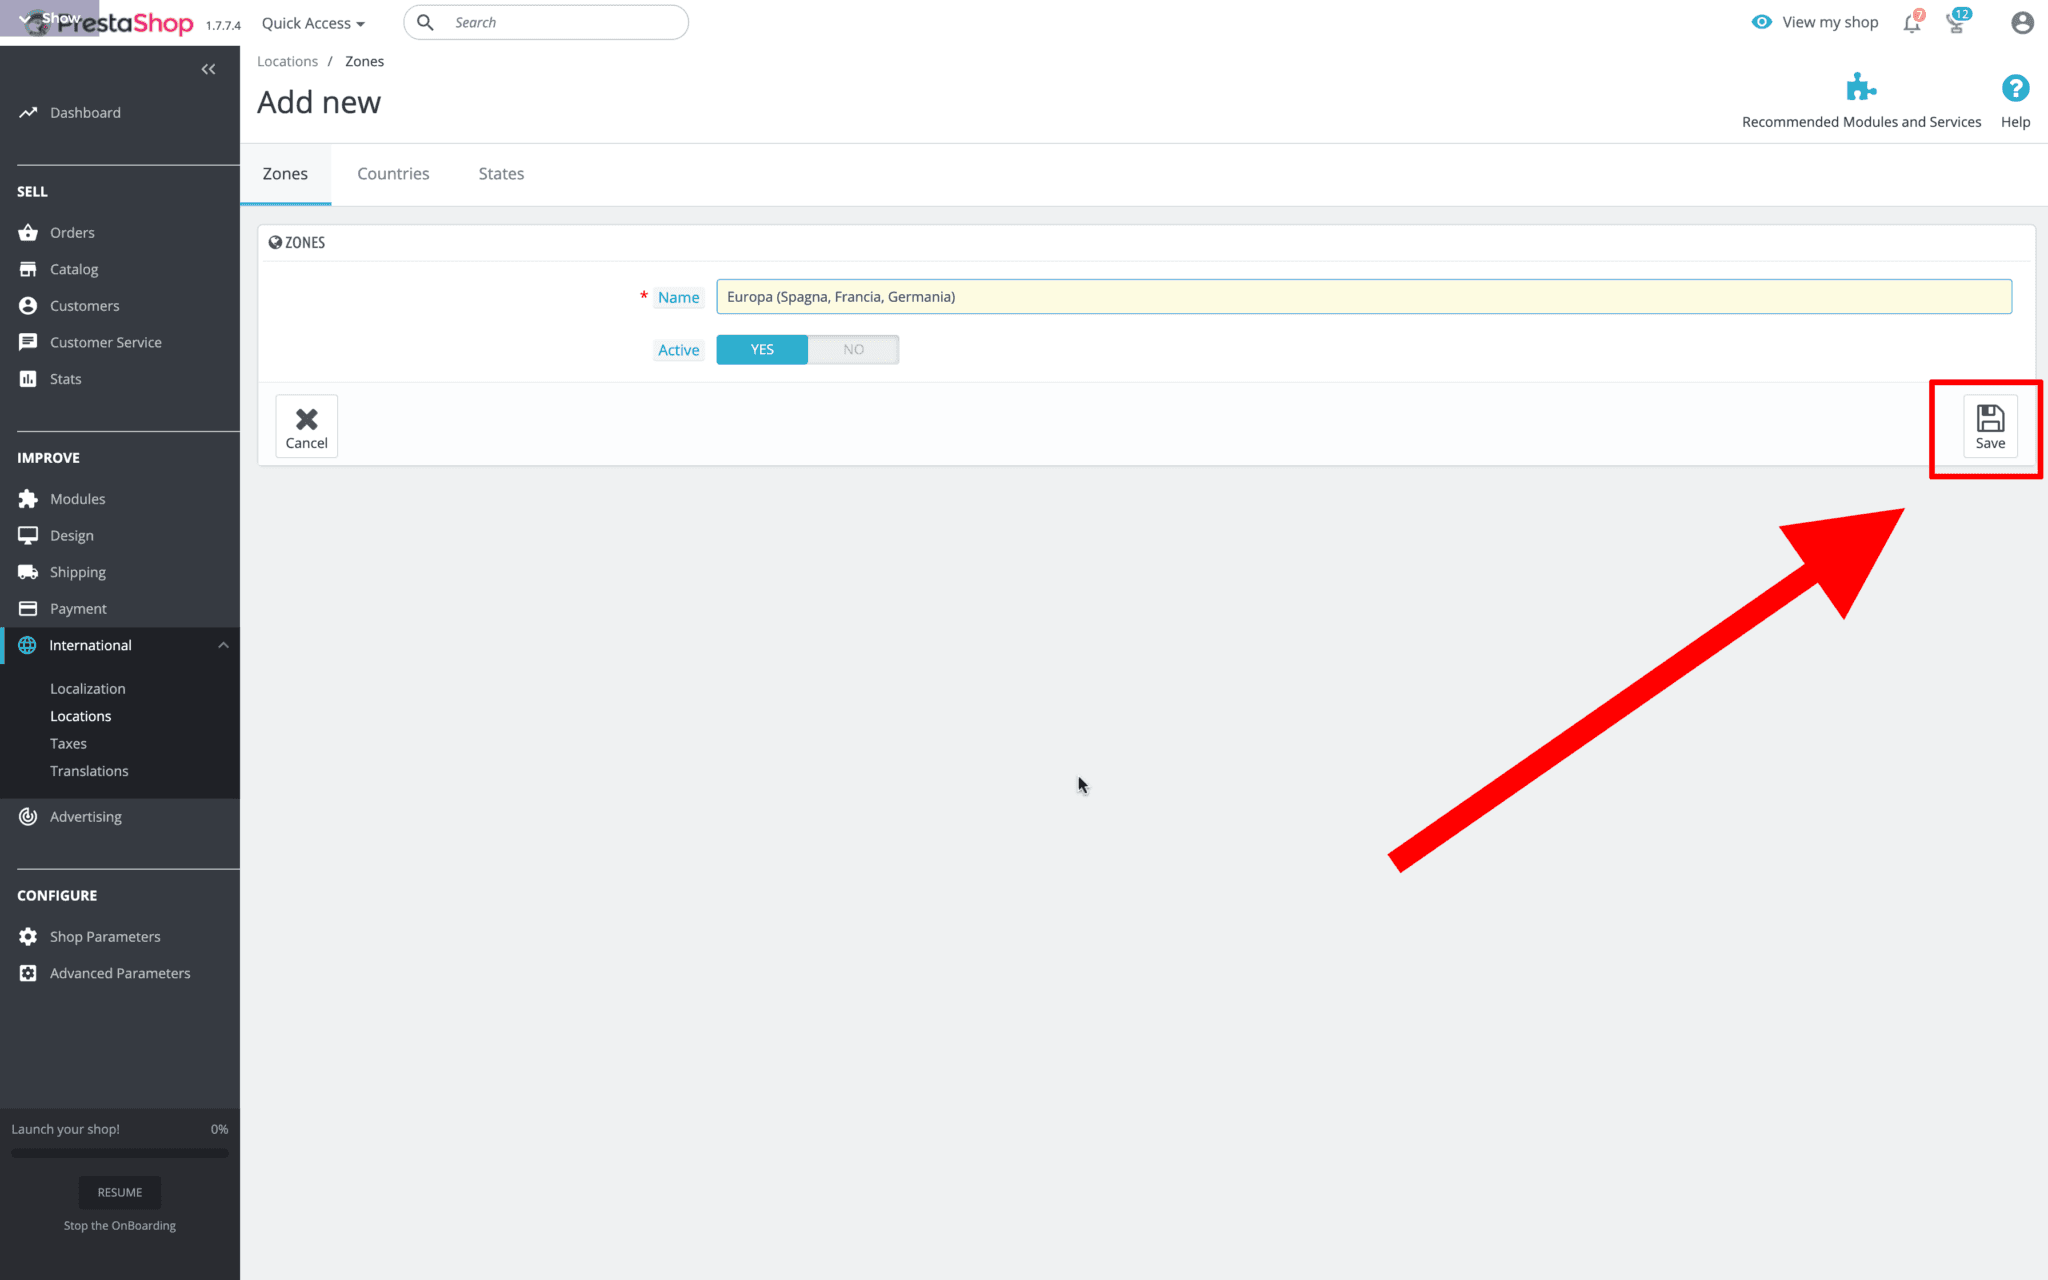
Once you've chosen which naming convention to use, all you have to do is click "Save".
PrestaShop shipping: adding states to a zone
After creating a zone, you need to tell PrestaShop which states are part of that zone. To do this, simply click "Countries" and move to the next tab.
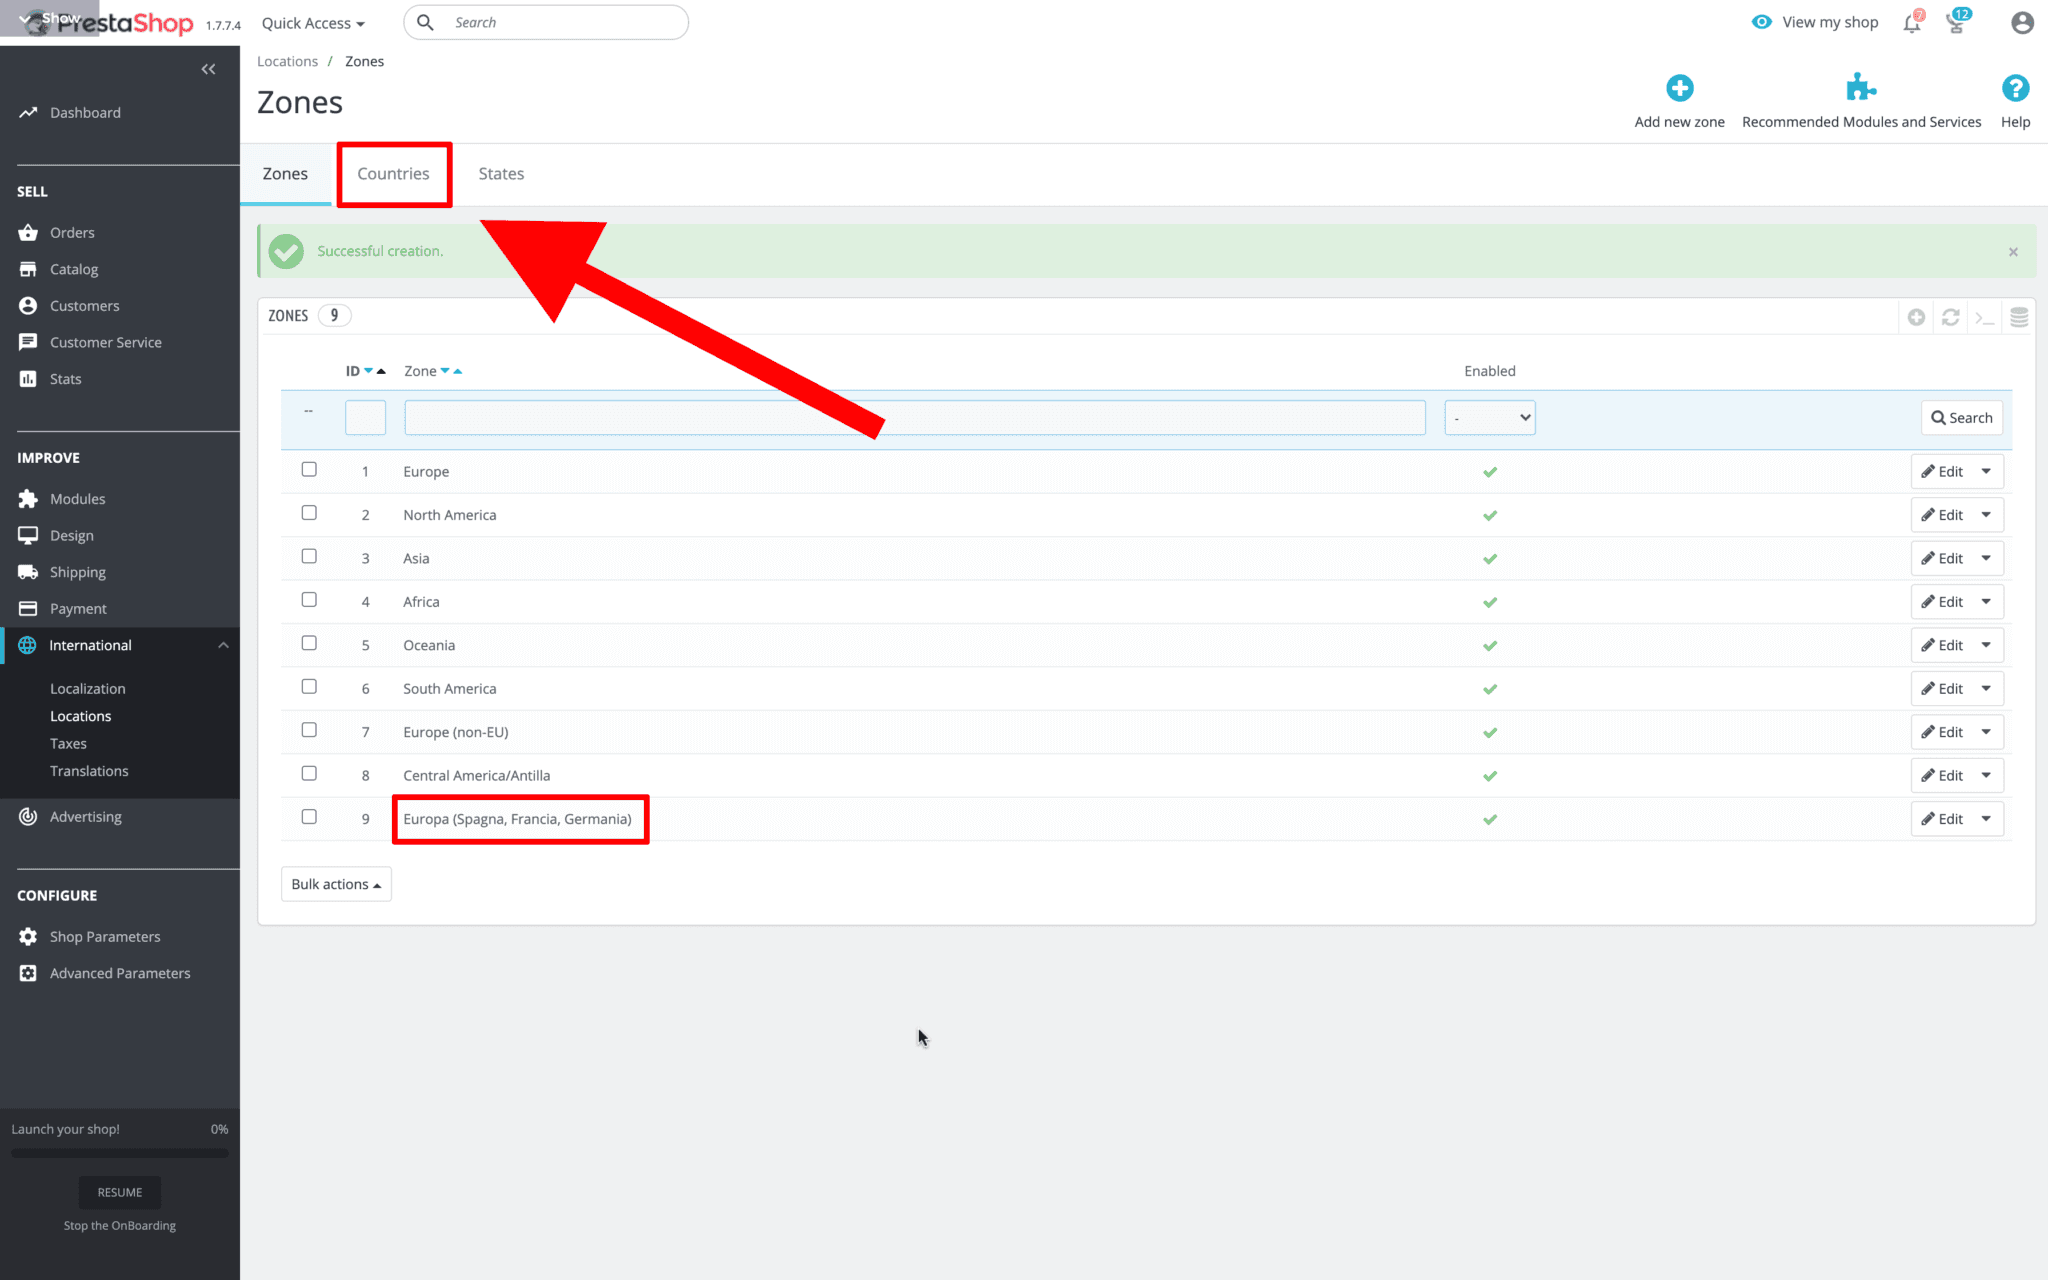
and you'll find yourself looking at this list:
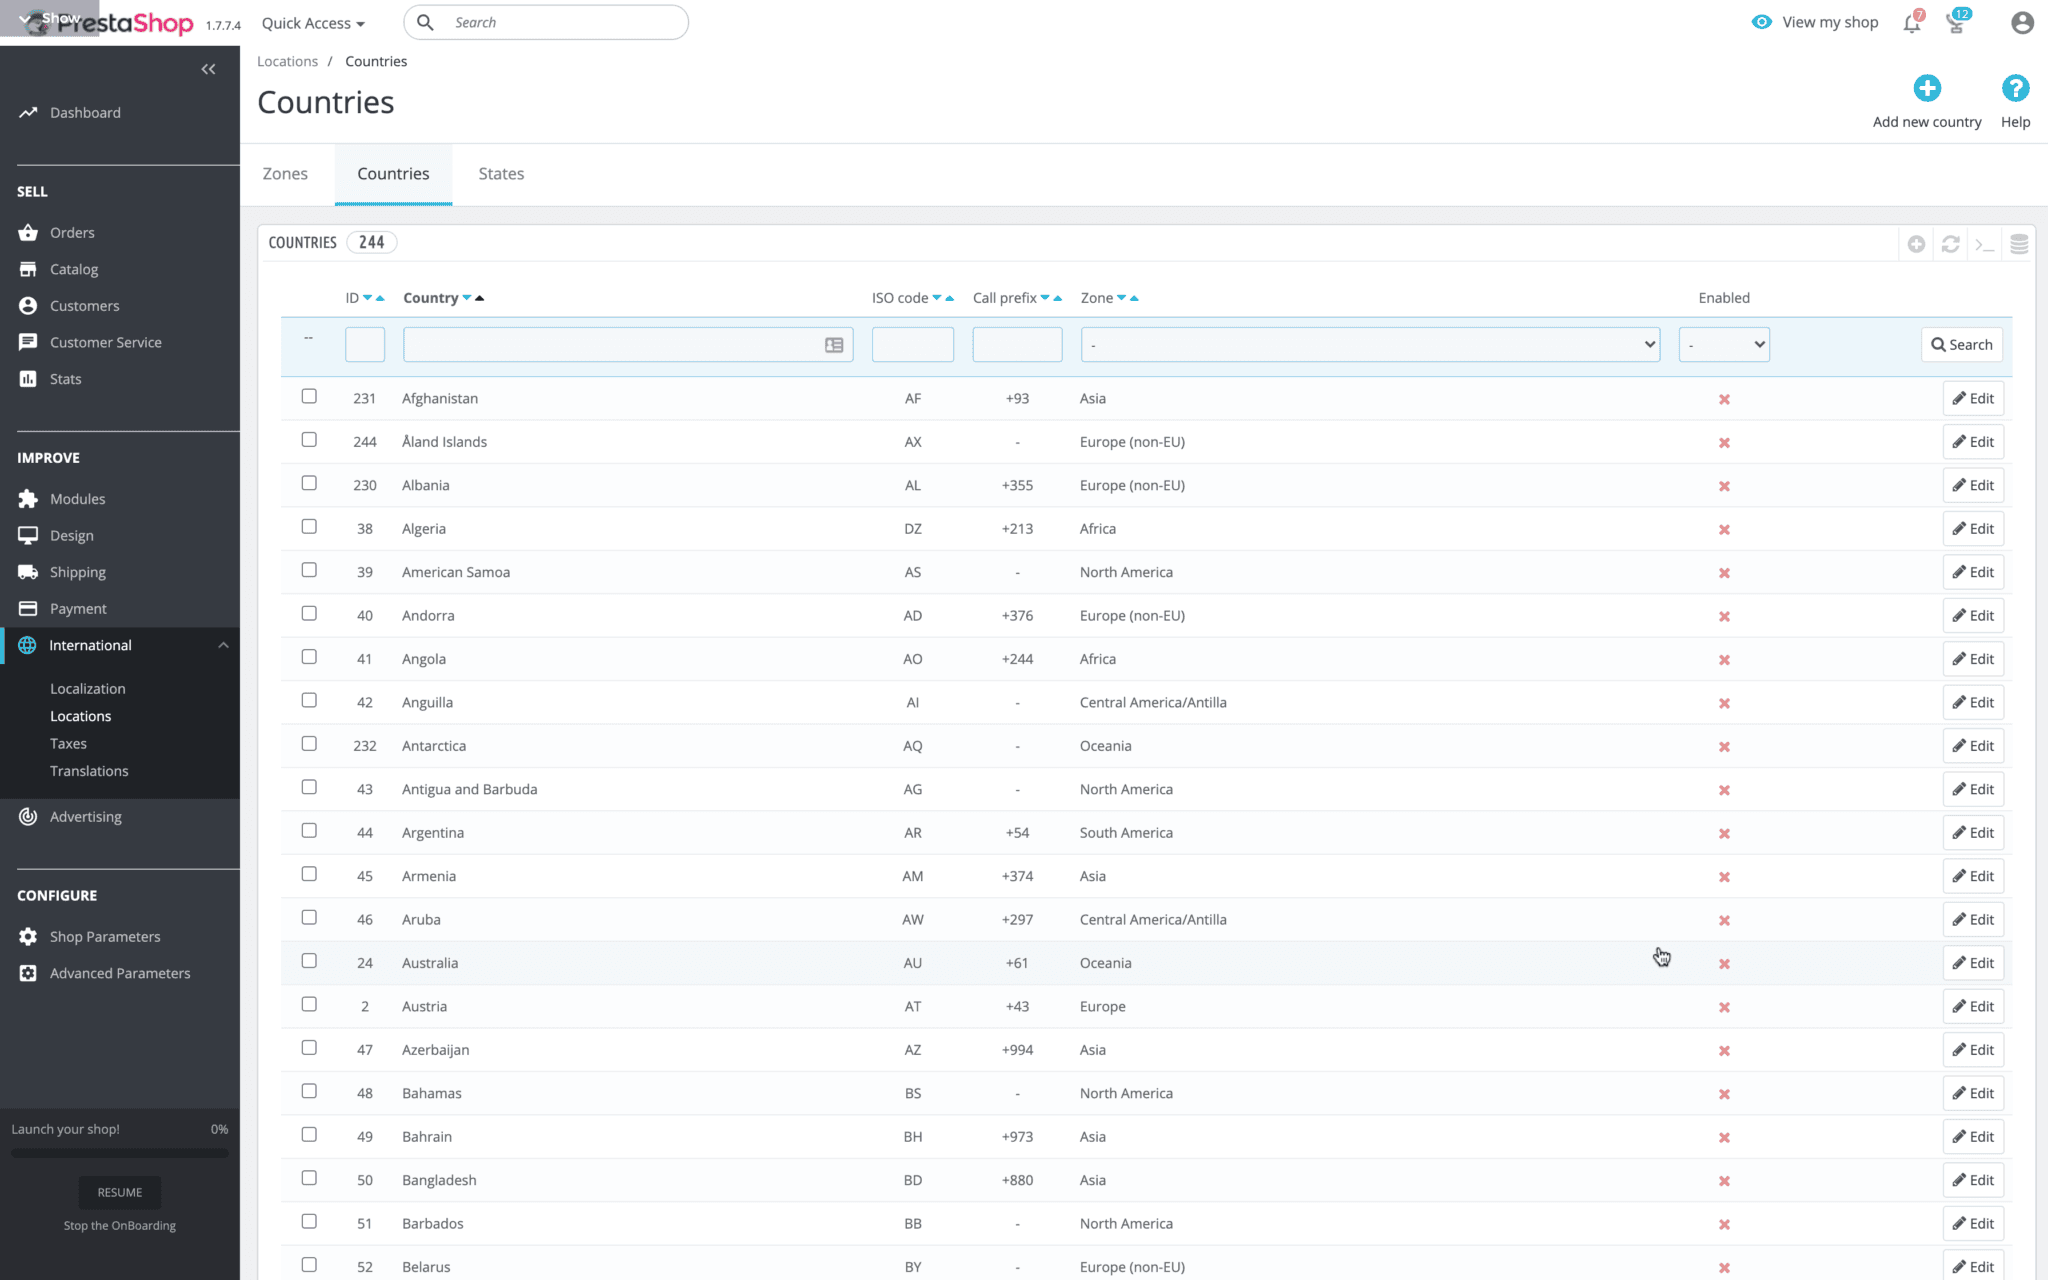
From here you can edit the settings for every country in the world in just a few clicks. To assign a country to a shipping zone, simply search for it using the search function and click "Edit".

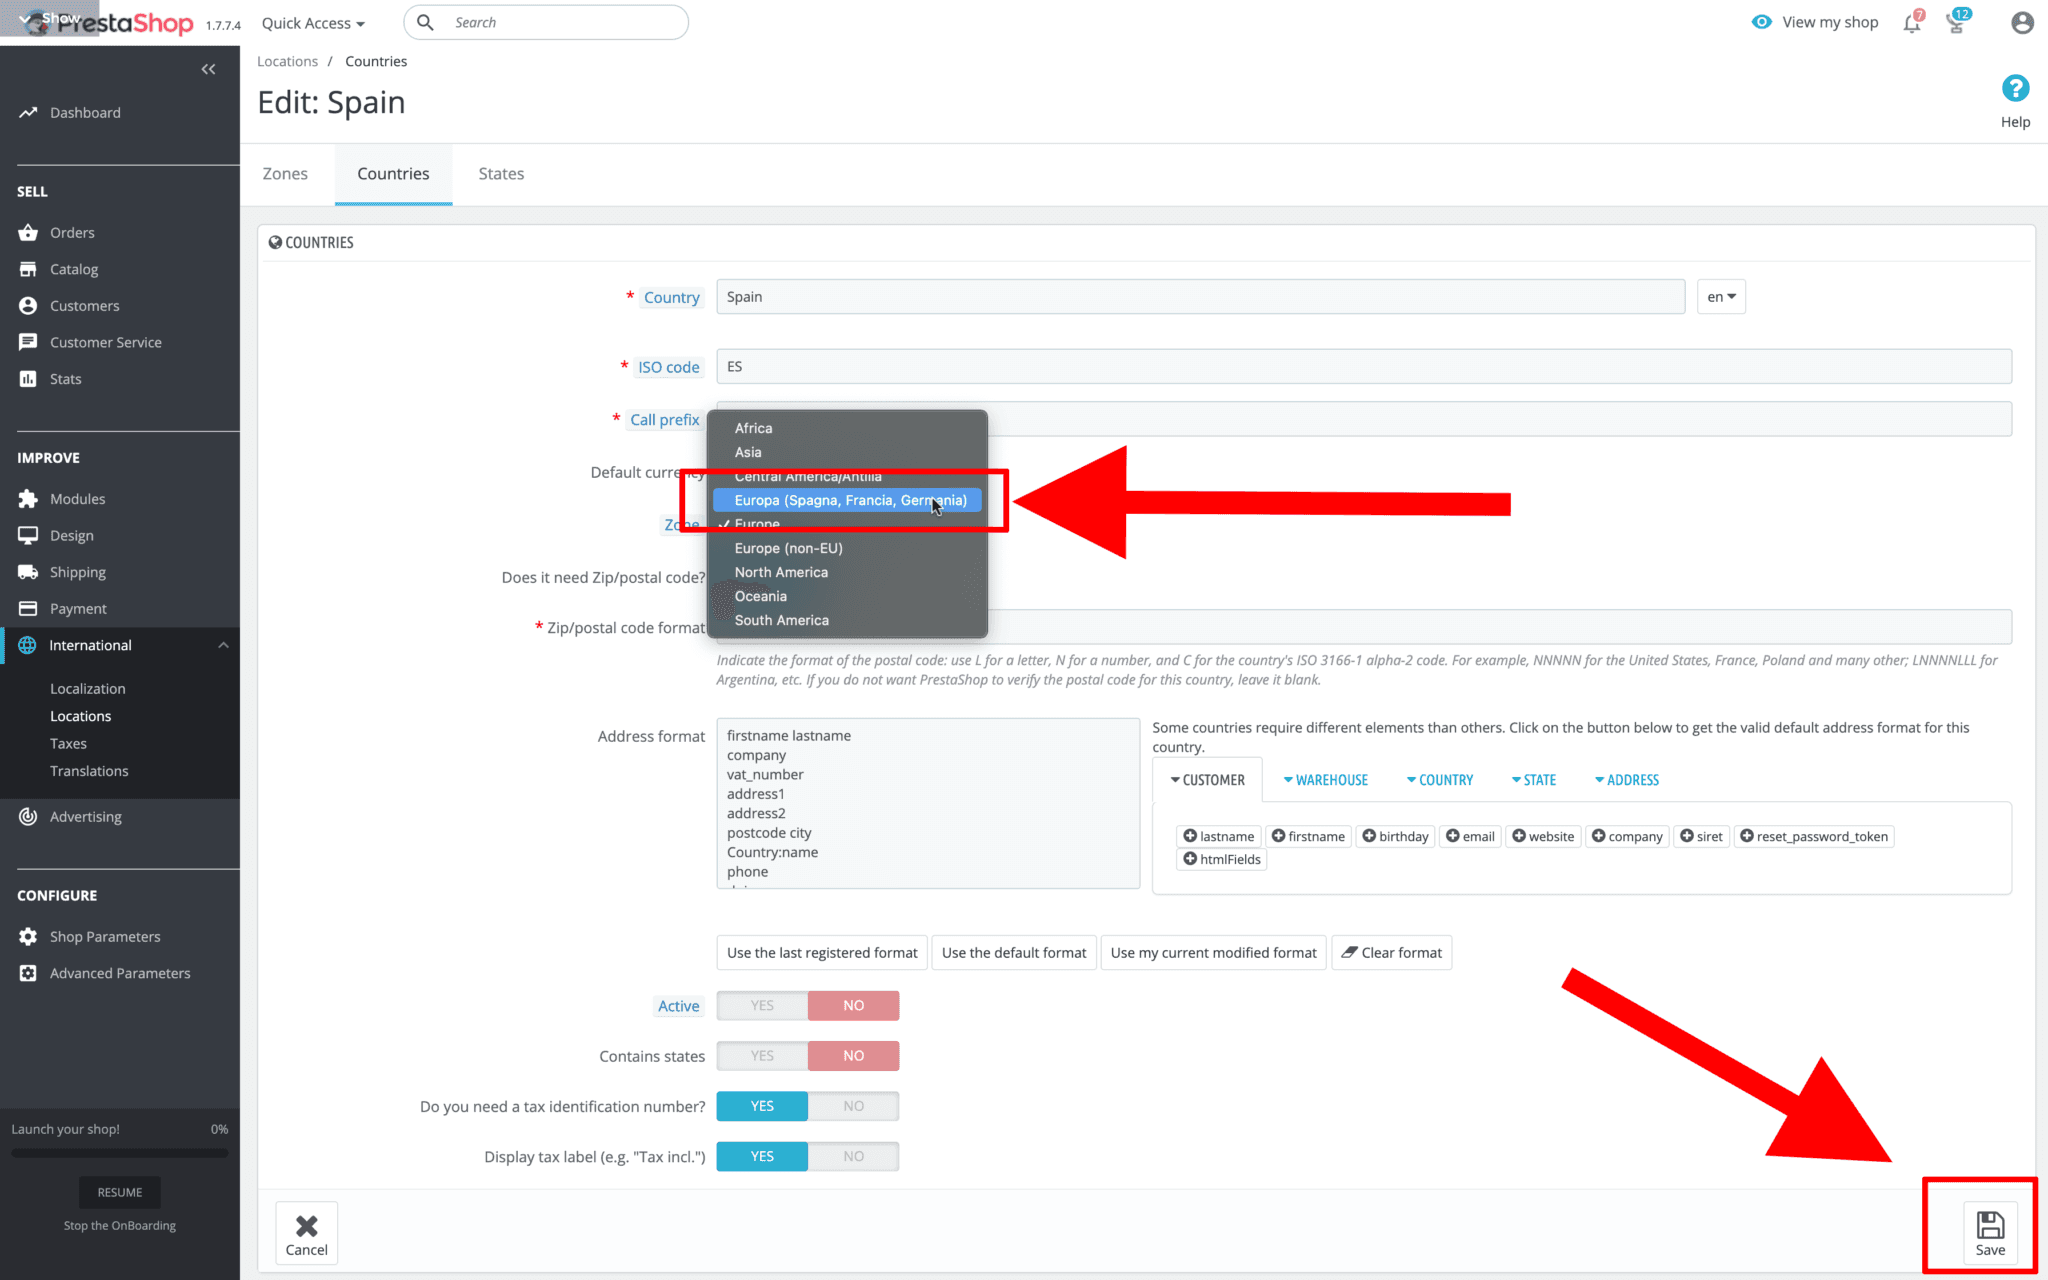
The screen will show all the parameters that allow PrestaShop to identify the state in question. Among these parameters is also "Zone".

By clicking on the drop-down menu you can change the zone assigned to the state. Once you've selected the zone you want, all that's left is to save.
Once you've set up all the zones, it's time to set up the carriers.
PrestaShop shipping: setting up carriers
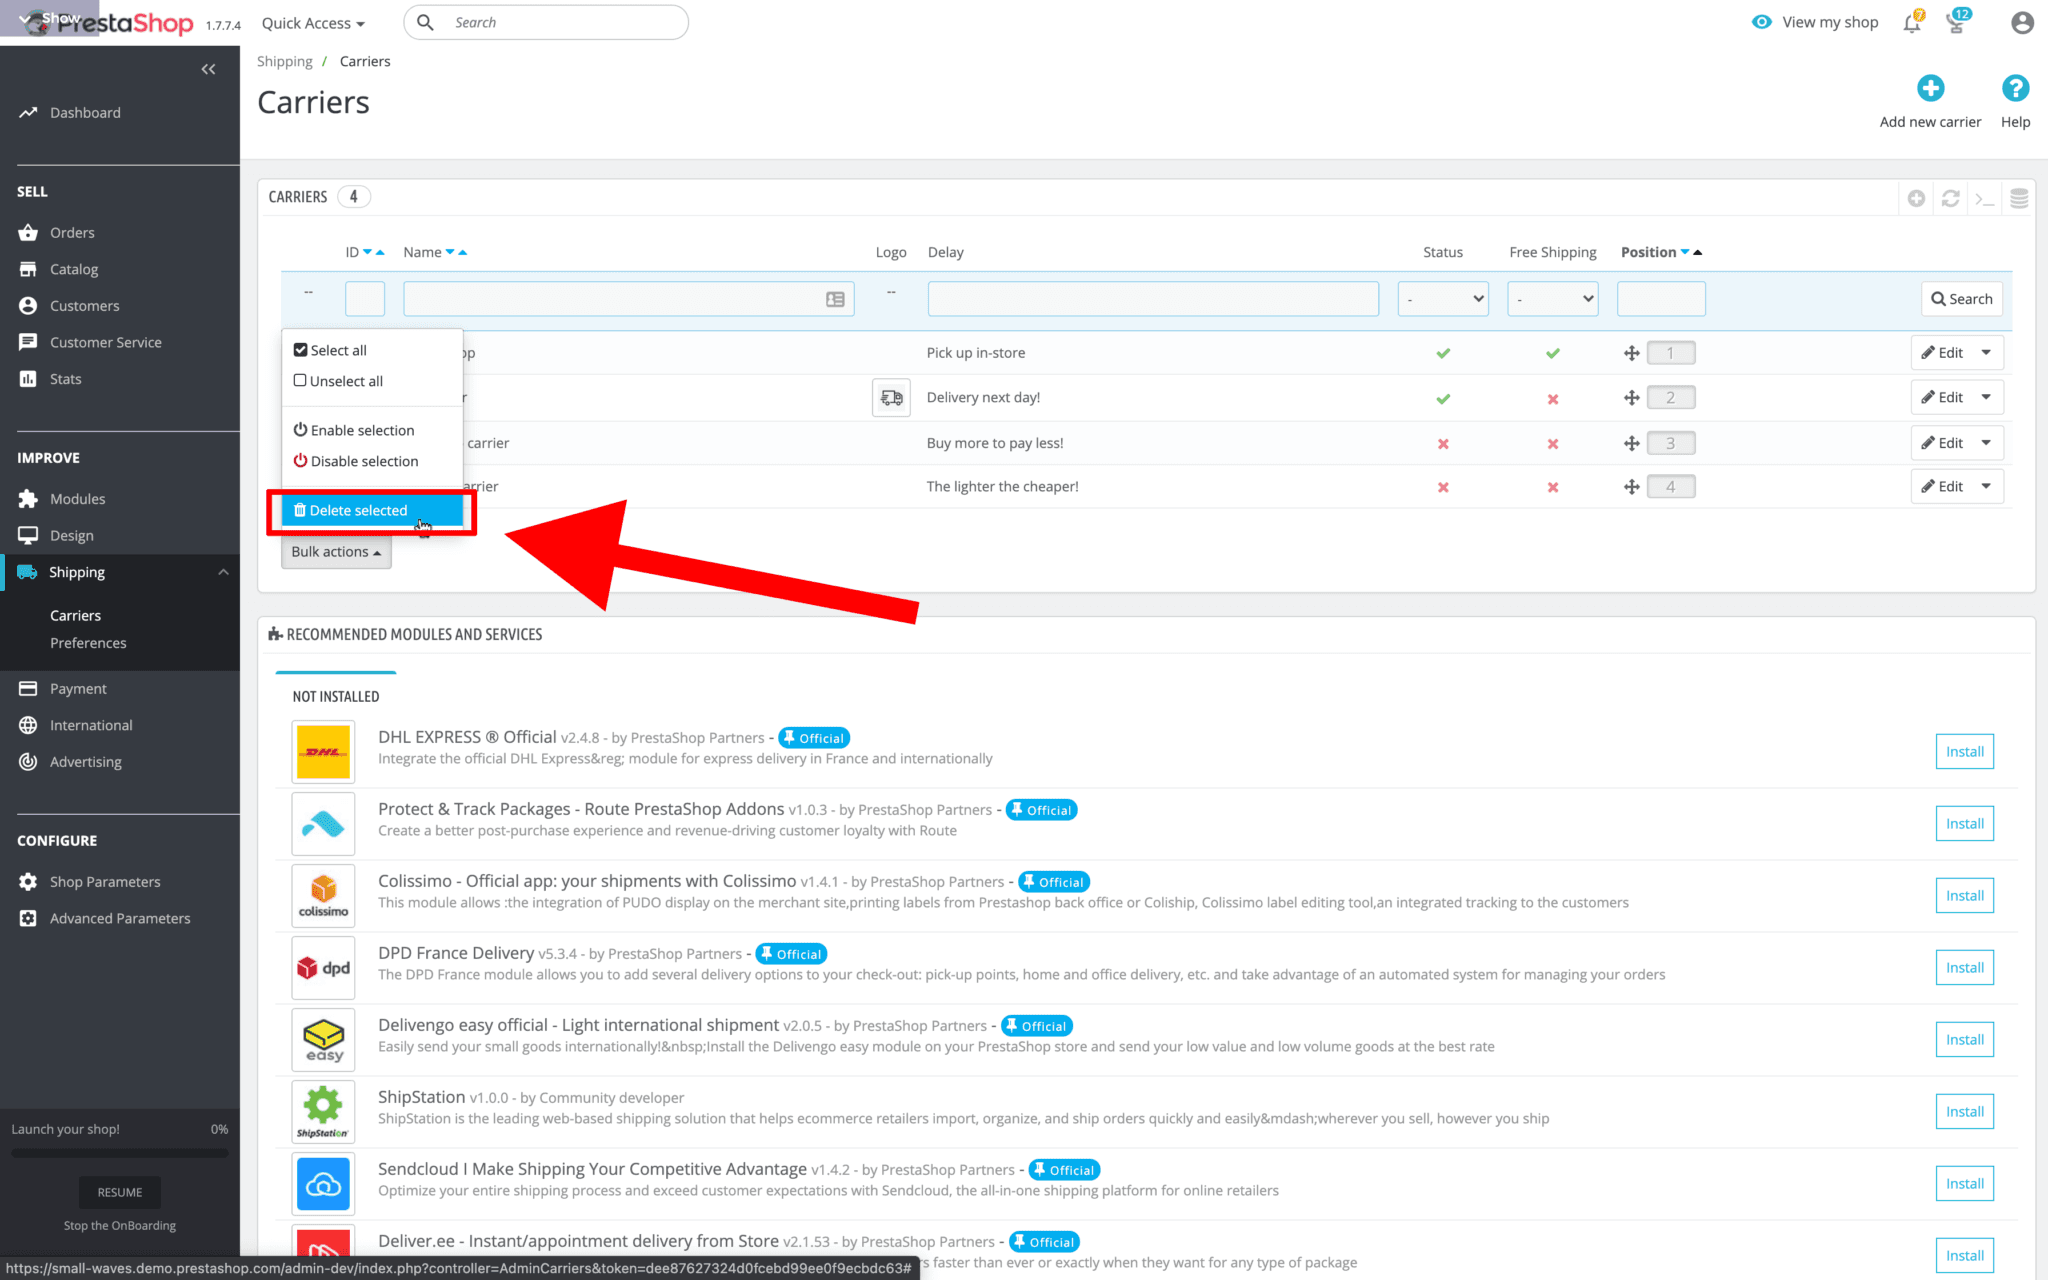
To edit and create carriers, simply click on the left-hand menu: "Shipping" and then "Carriers". You'll see this new screen.
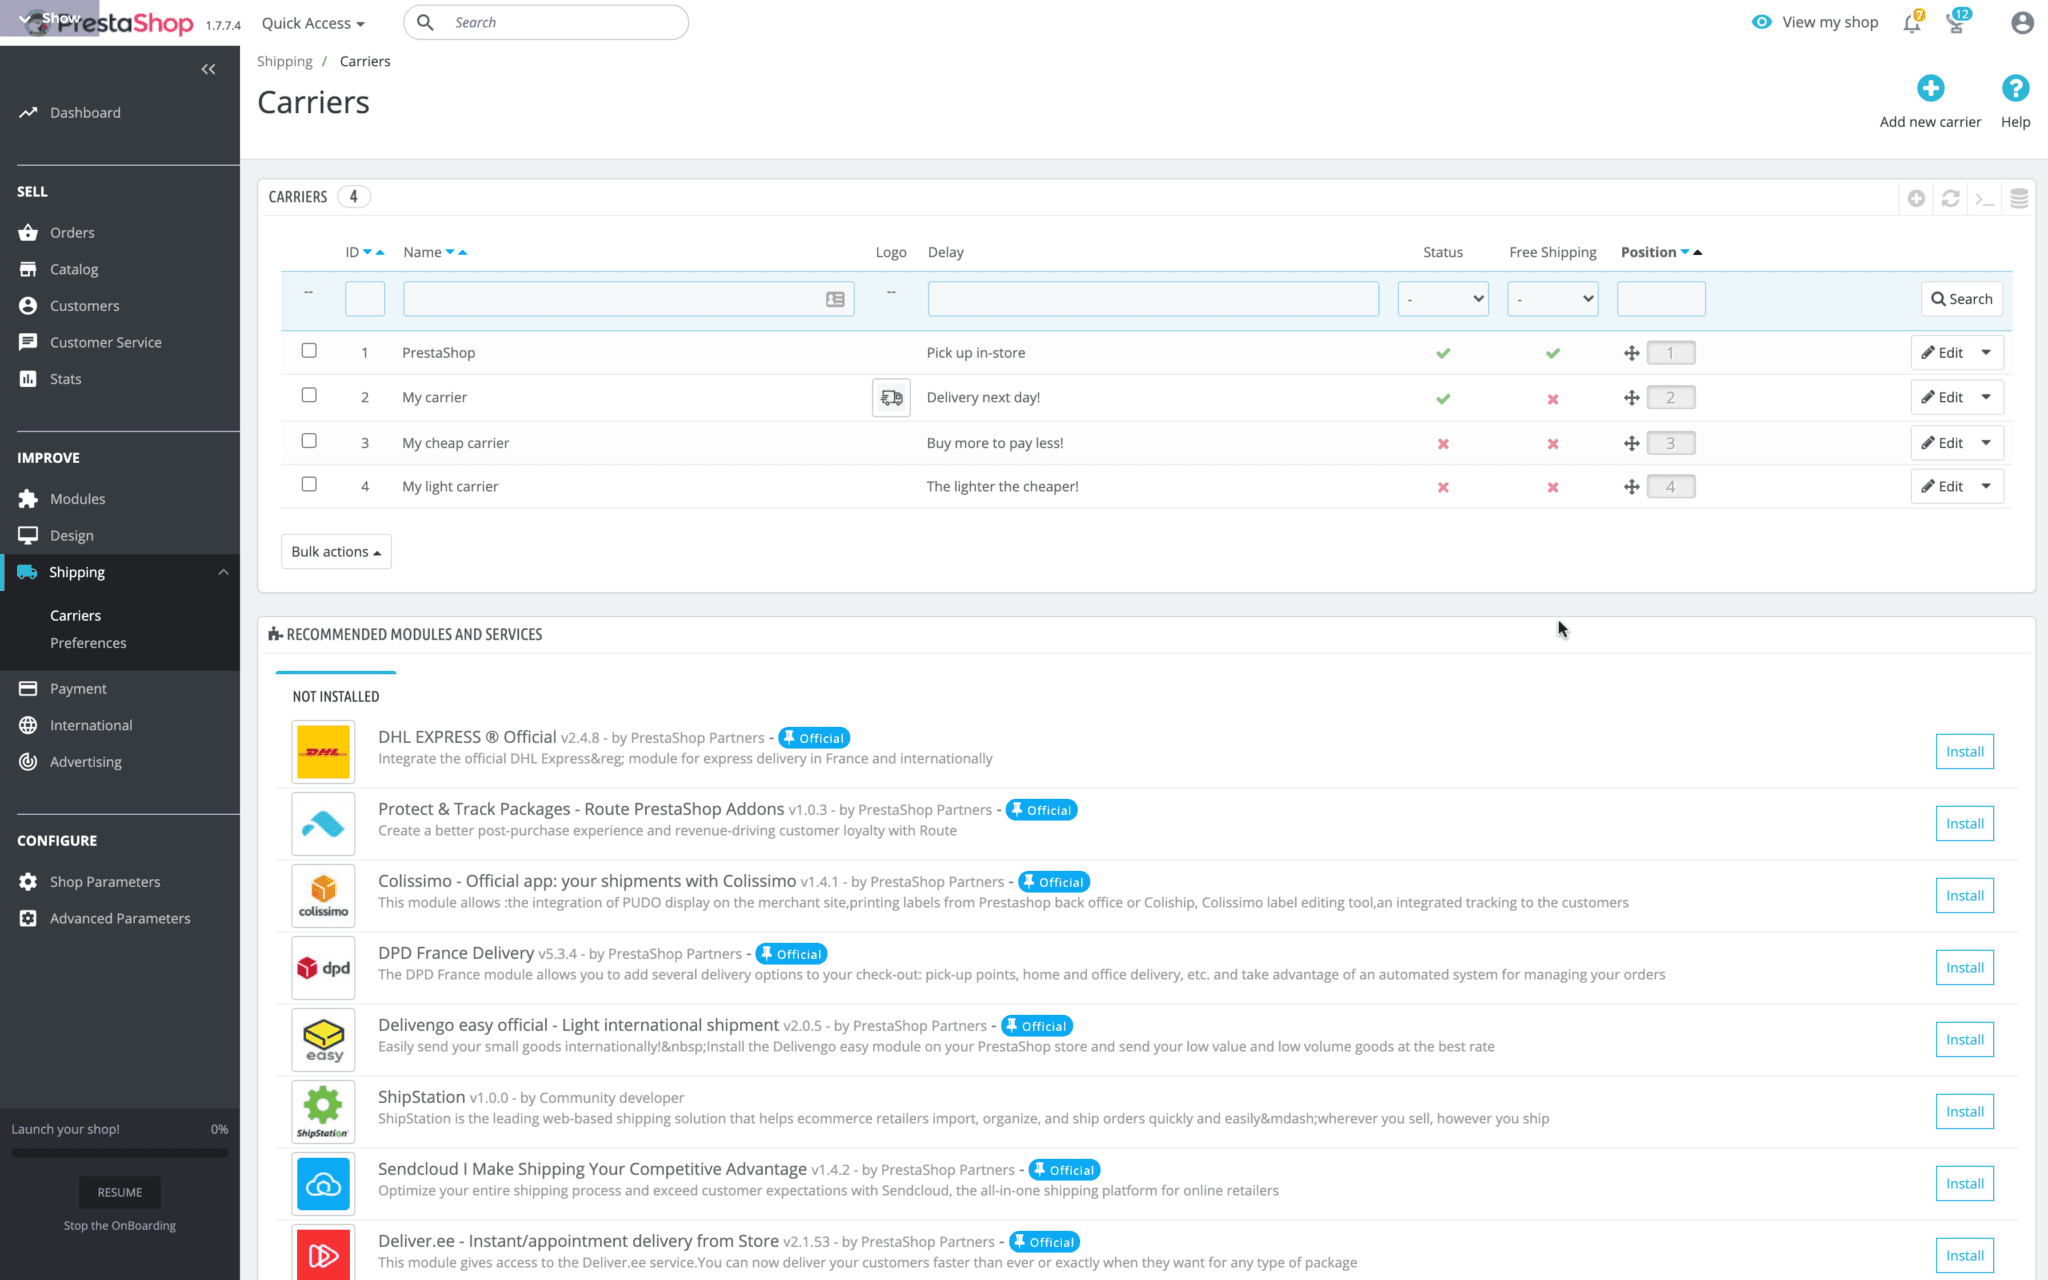
The first thing to do is delete the carriers automatically created by PrestaShop. This is a very simple operation that will help you keep everything tidy and well organized.
You can select all the carriers you want to delete using the selection box (or "Bulk actions" > "Select all")
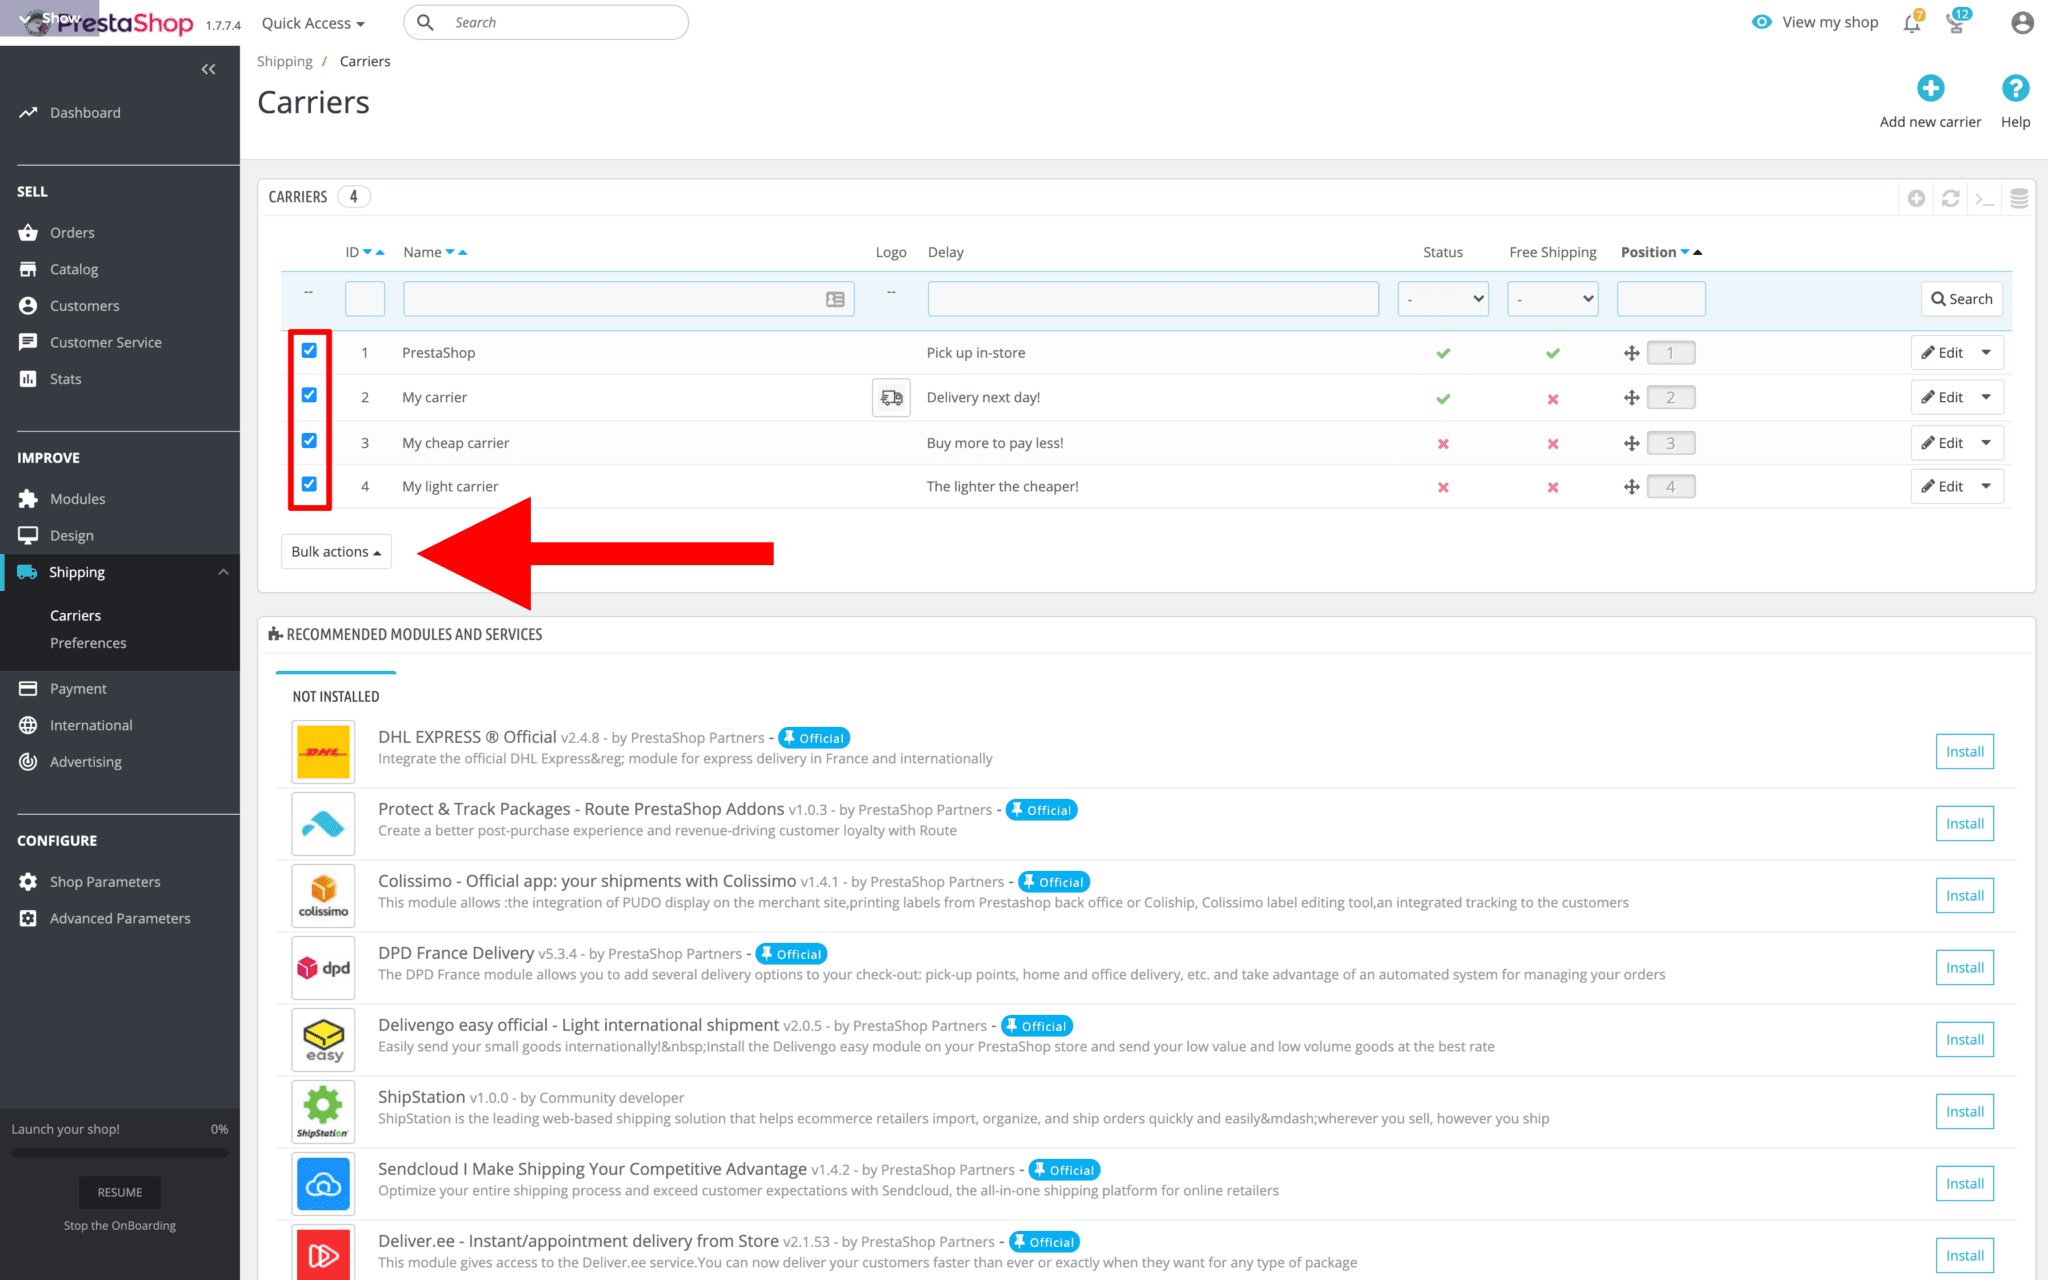
Once you've selected all the carriers you want to delete, just click "Bulk actions" and select "Delete selected"
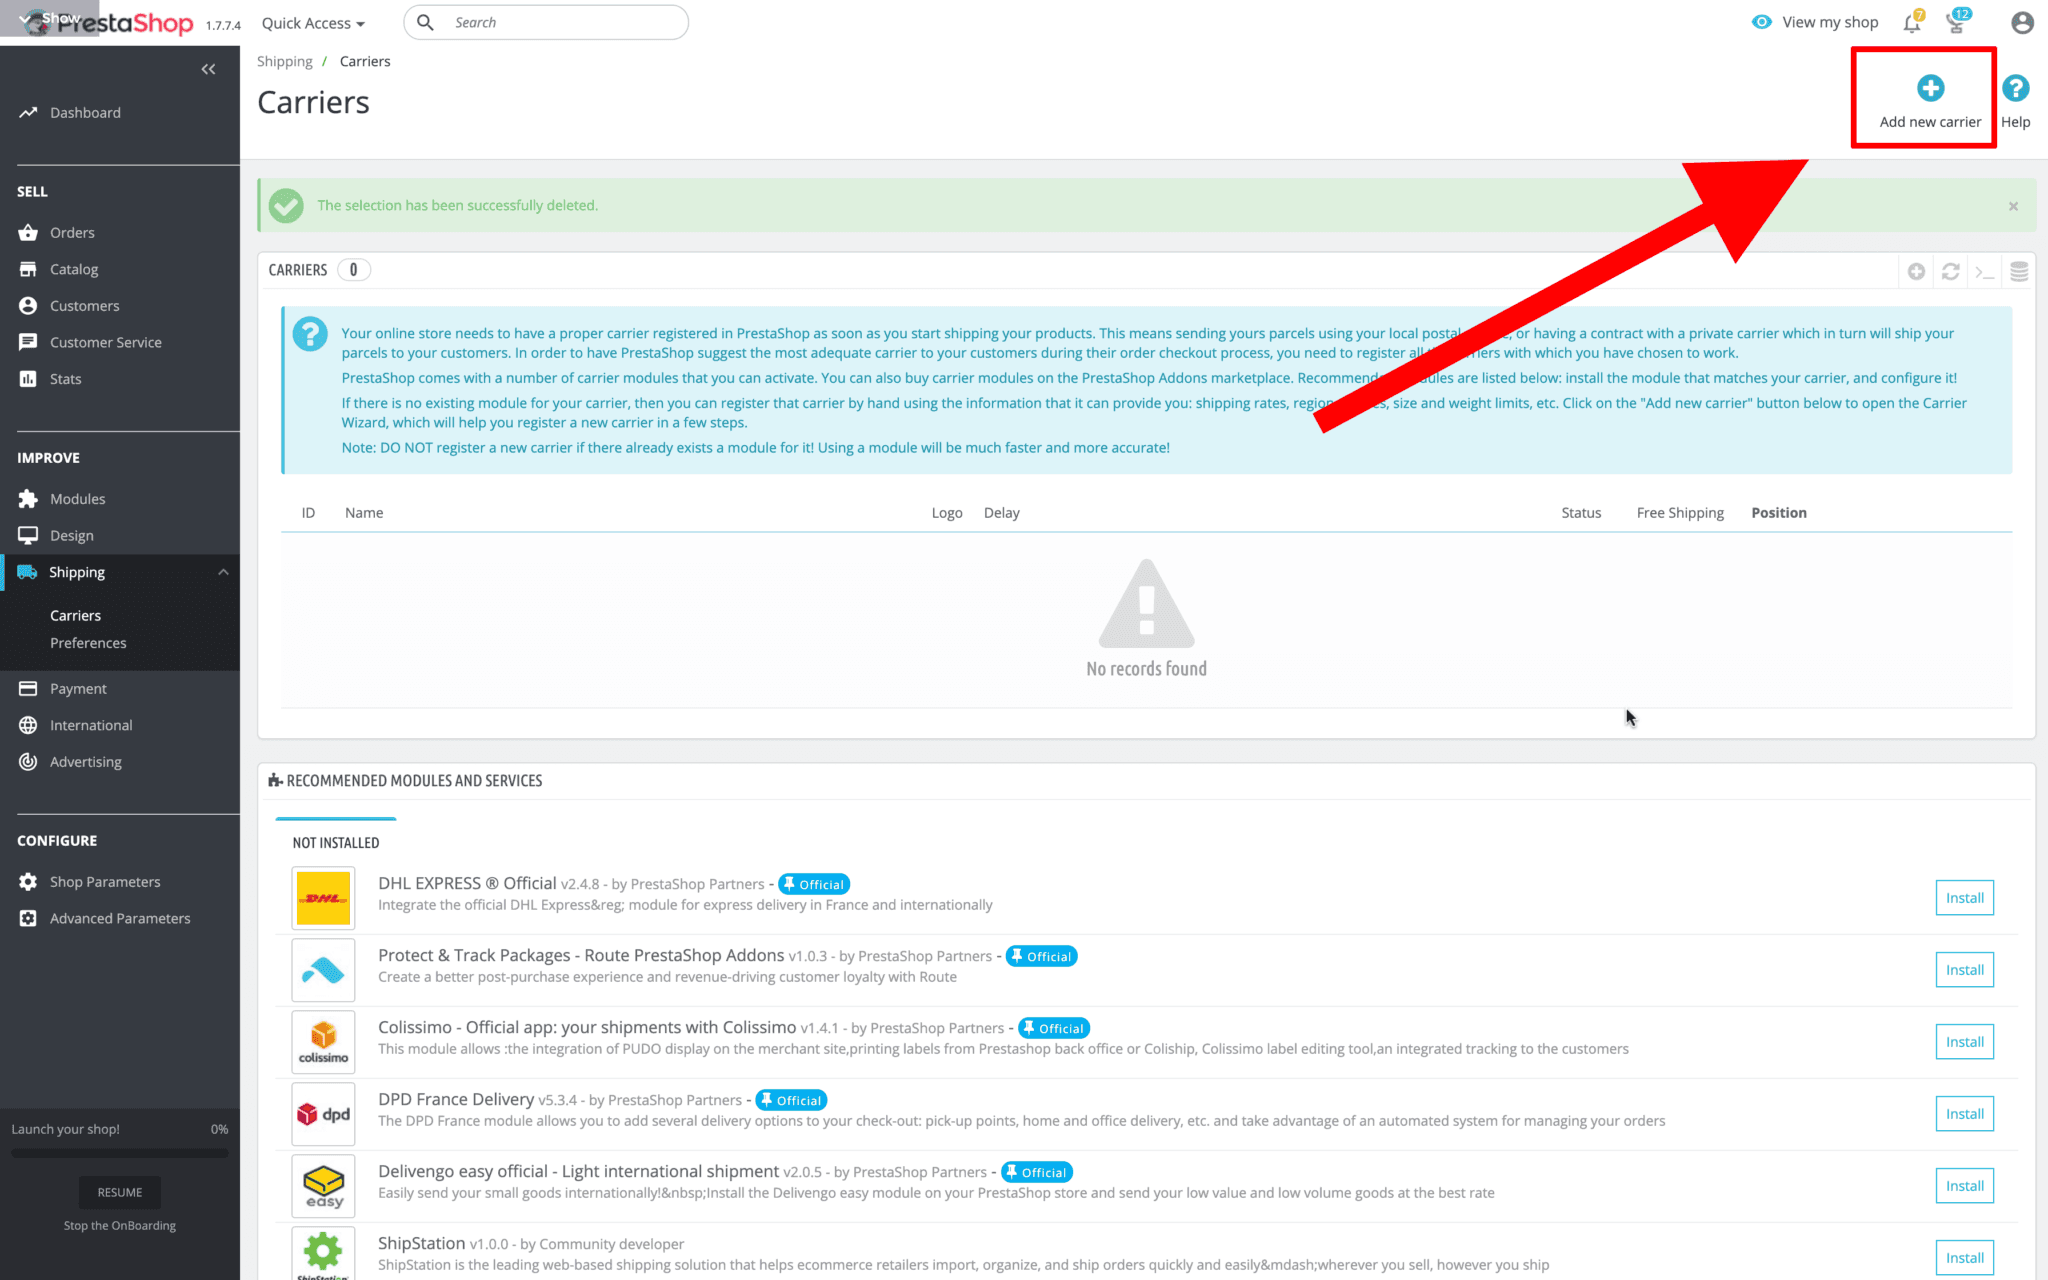
Now that everything's clean and reset, you can create a new carrier.
Just click the "Add new carrier" button in the top right to start the creation process.
To create a new carrier, PrestaShop will take you to a screen very similar to the installation wizards used by software programs.
It's a multi-step process during which you can enter all the necessary data.
Let's see what's ahead.
PrestaShop carriers: general settings
The first screen is the general settings screen and contains 5 elements.
Carrier name
Transit time
Speed grade
Logo
Tracking URL
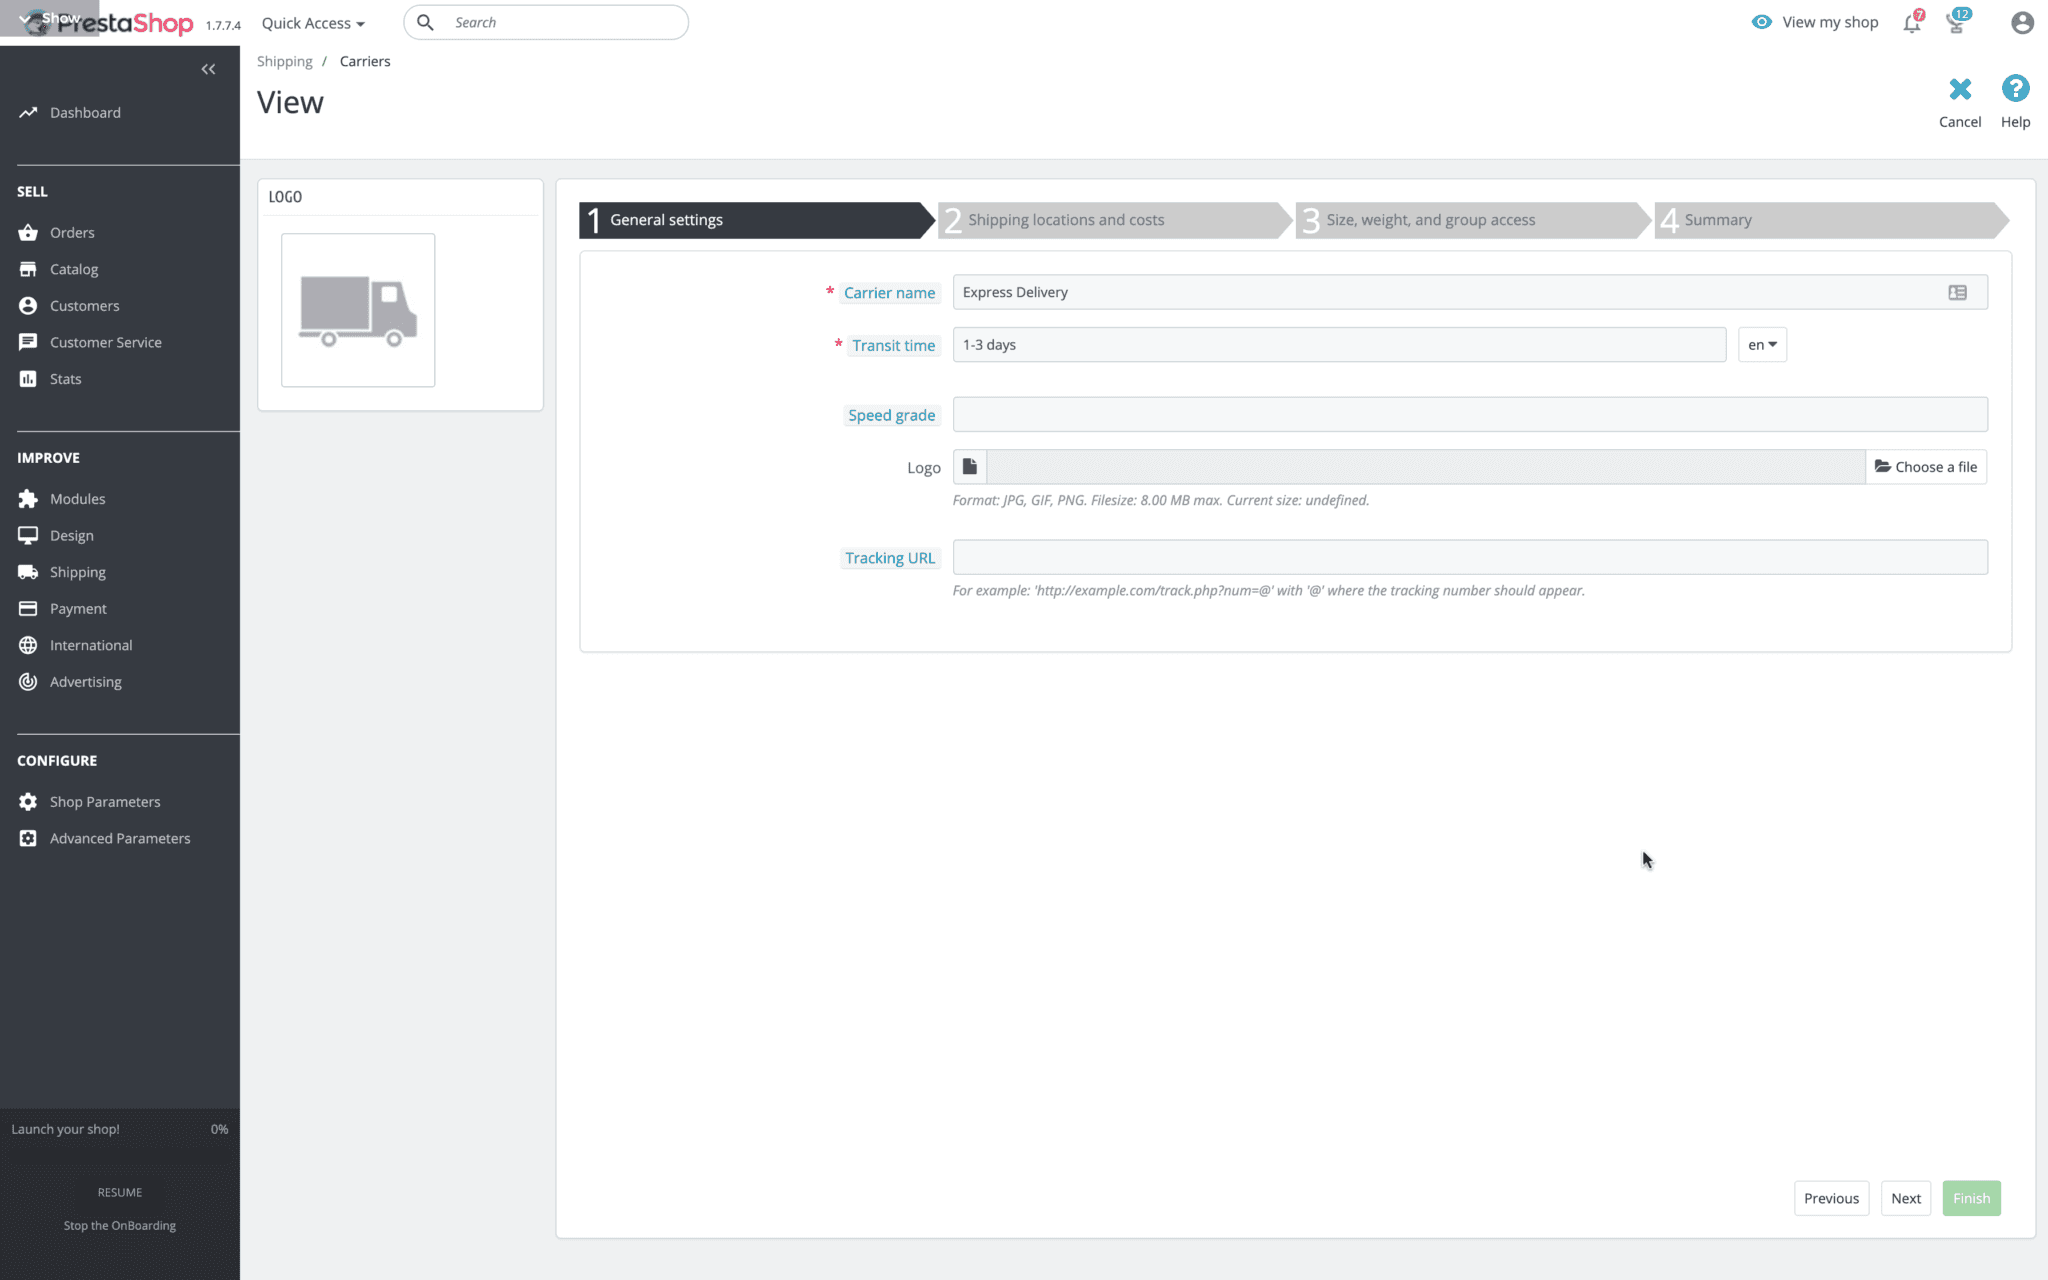
Carrier name
This is the option displayed to your customers at checkout.
You can use whatever logic you prefer to choose the name. The only important thing is that it's clear to the people buying your products, too.
"Express Shipping" and "Standard Shipping" are good options if you offer different shipping methods with different cost brackets.
If you only use one carrier, you can directly use the carrier's name and the service the shipment is associated with (e.g. DHL Express).
Another thing to consider (besides clarity) is keeping the naming of your carriers consistent.
Transit time
This is the estimated delivery time for this particular carrier. The best approach is to use the reference times provided by the carrier (and your own experience with delivery punctuality).
As a general rule, it's better to allow for one extra day and have the goods arrive early, rather than allow for one day less and have to explain to your customers why the goods are late.
However, don't overdo it with the margin of tolerance, or you might discourage some customers from completing their order!
Speed Grade
In this field you can assign a rating from zero to nine to the carrier's delivery speed. Zero is for the slowest carrier, nine for the fastest, with everything else falling in between.
Assigning ratings will allow PrestaShop to show which is the fastest carrier without having to compare shipping days.
Logo
This option lets you add a logo to associate with the carrier. It can be the carrier's logo or a custom logo of your choice, if you don't want to specify the name of the company handling the shipment.
Tracking URL
If the shipping service you use has a tracking system, you can enter the link here. This way your customers will be able to track their package themselves.
The only parameters you're required to enter in order to continue are "Carrier name" and "Transit time".
Once everything's set, just click "Next" to move on to entering destinations and shipping costs.
PrestaShop carriers: destinations and shipping costs
On this screen you can set up all the pricing options relating to shipping. Let's see how to use them.
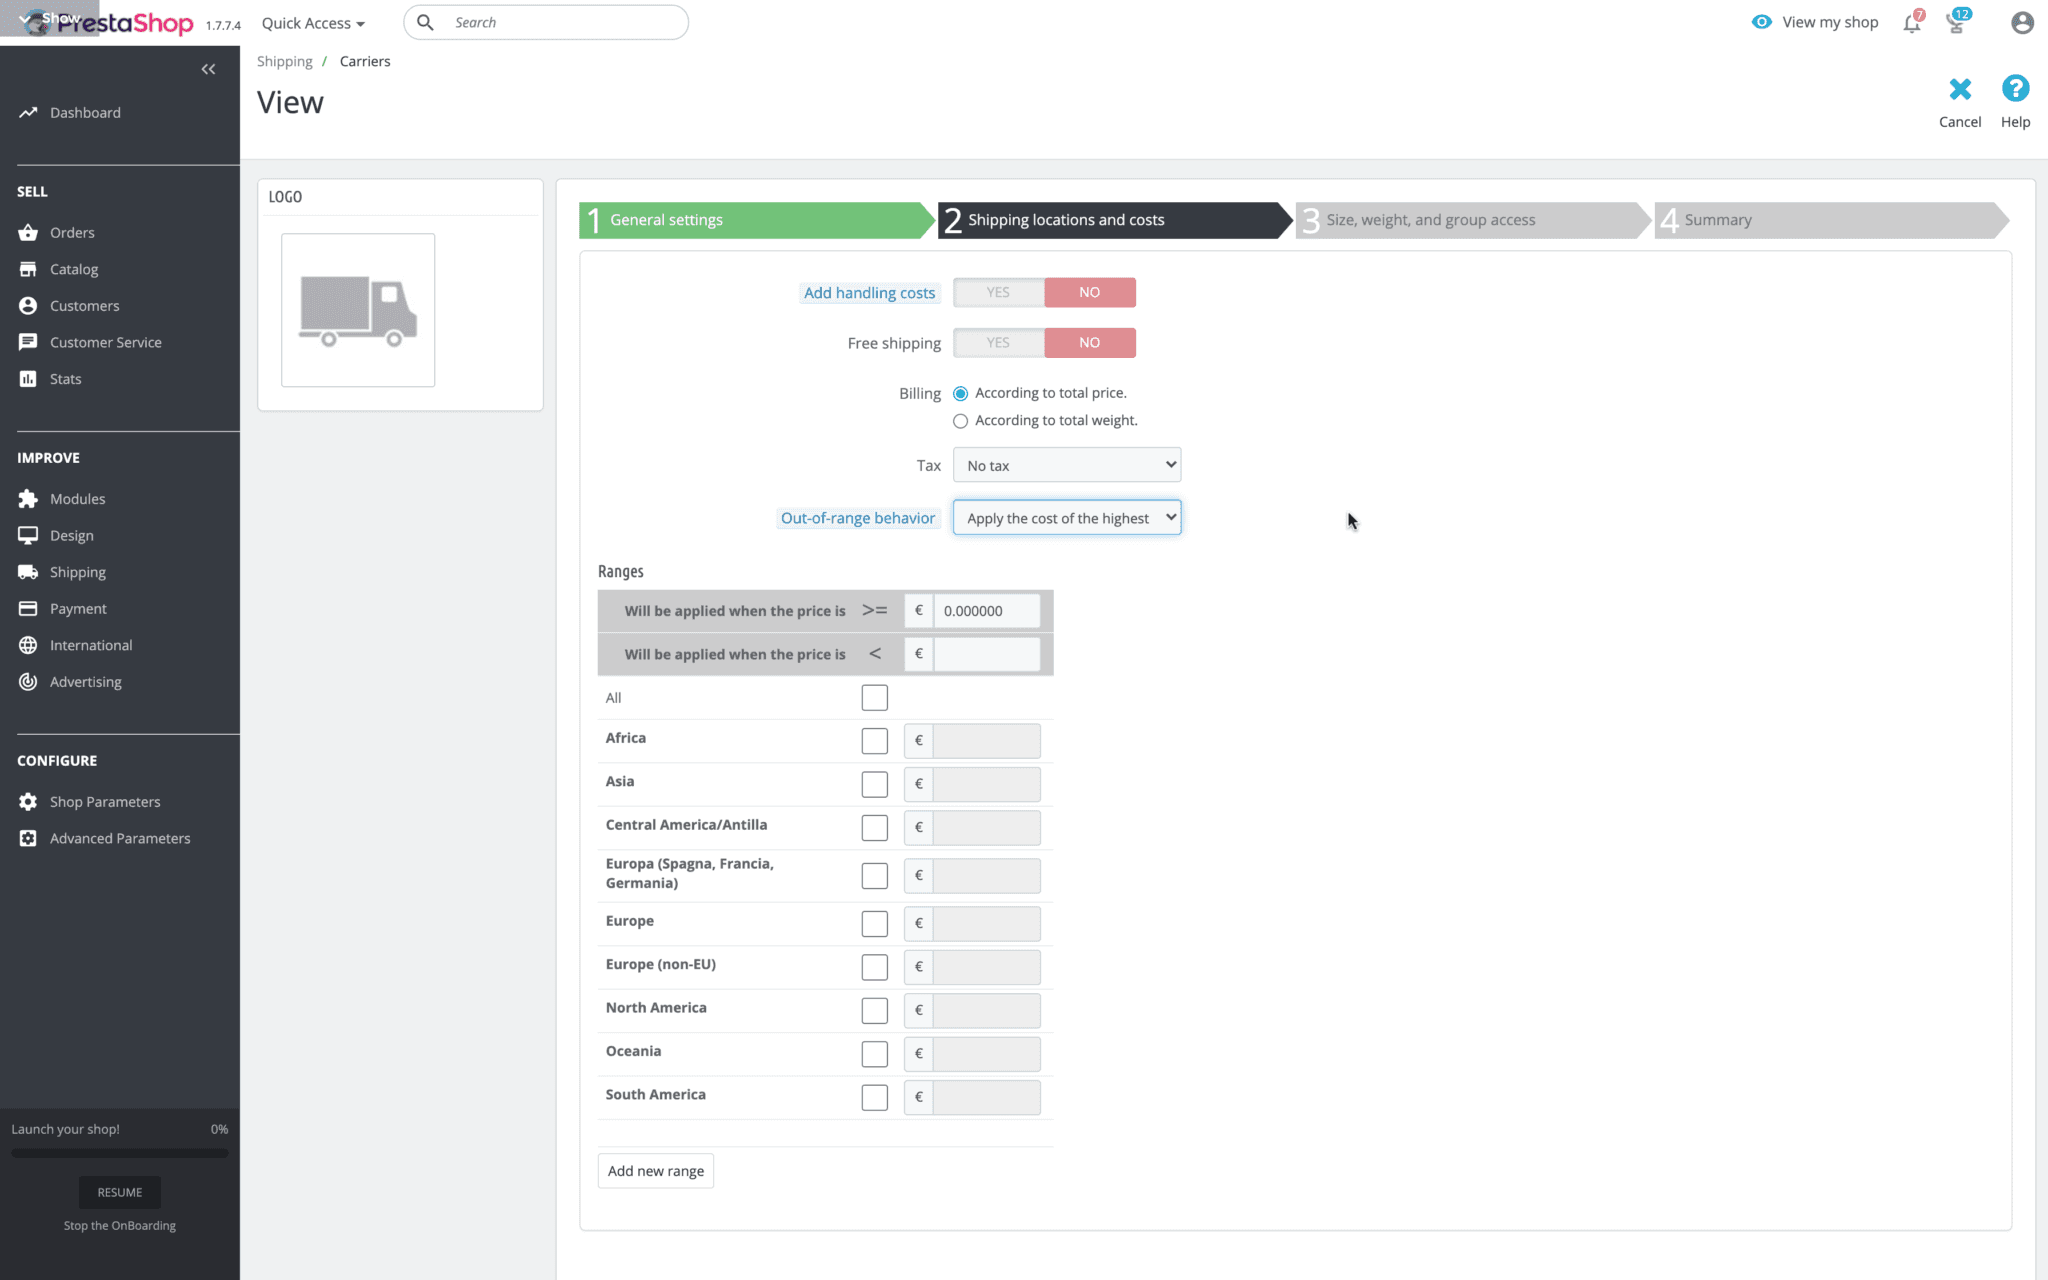
Add handling cost
This option can be used to add your internal handling costs for goods (such as packaging costs, for example).
Free Shipping
A very popular sales strategy (especially when shipping costs are low) is to offer free shipping and fold the carrier's costs directly into the product price.
This is because, statistically, people are more inclined to buy when they see there are no extra shipping costs. It's a subtle psychological trick.
With this button you can mark the shipment as free shipping with a single click. Just remember to adjust your product prices accordingly.
Billing
With this option you can decide whether to set the different shipping cost brackets based on the total weight of the goods or on cart value.
Usually cart value is used as the reference if you want to offer free shipping to customers who spend more than a certain preset amount on a single order.
This strategy is an evolution of the previous trick.
Be careful, though: make sure "the threshold" is made known to customers who are close to the cart value you've set, before they reach checkout.
Out-of-range behavior
In this menu you can decide what happens if your customer's cart exceeds the weight or value ranges you've set for this carrier.
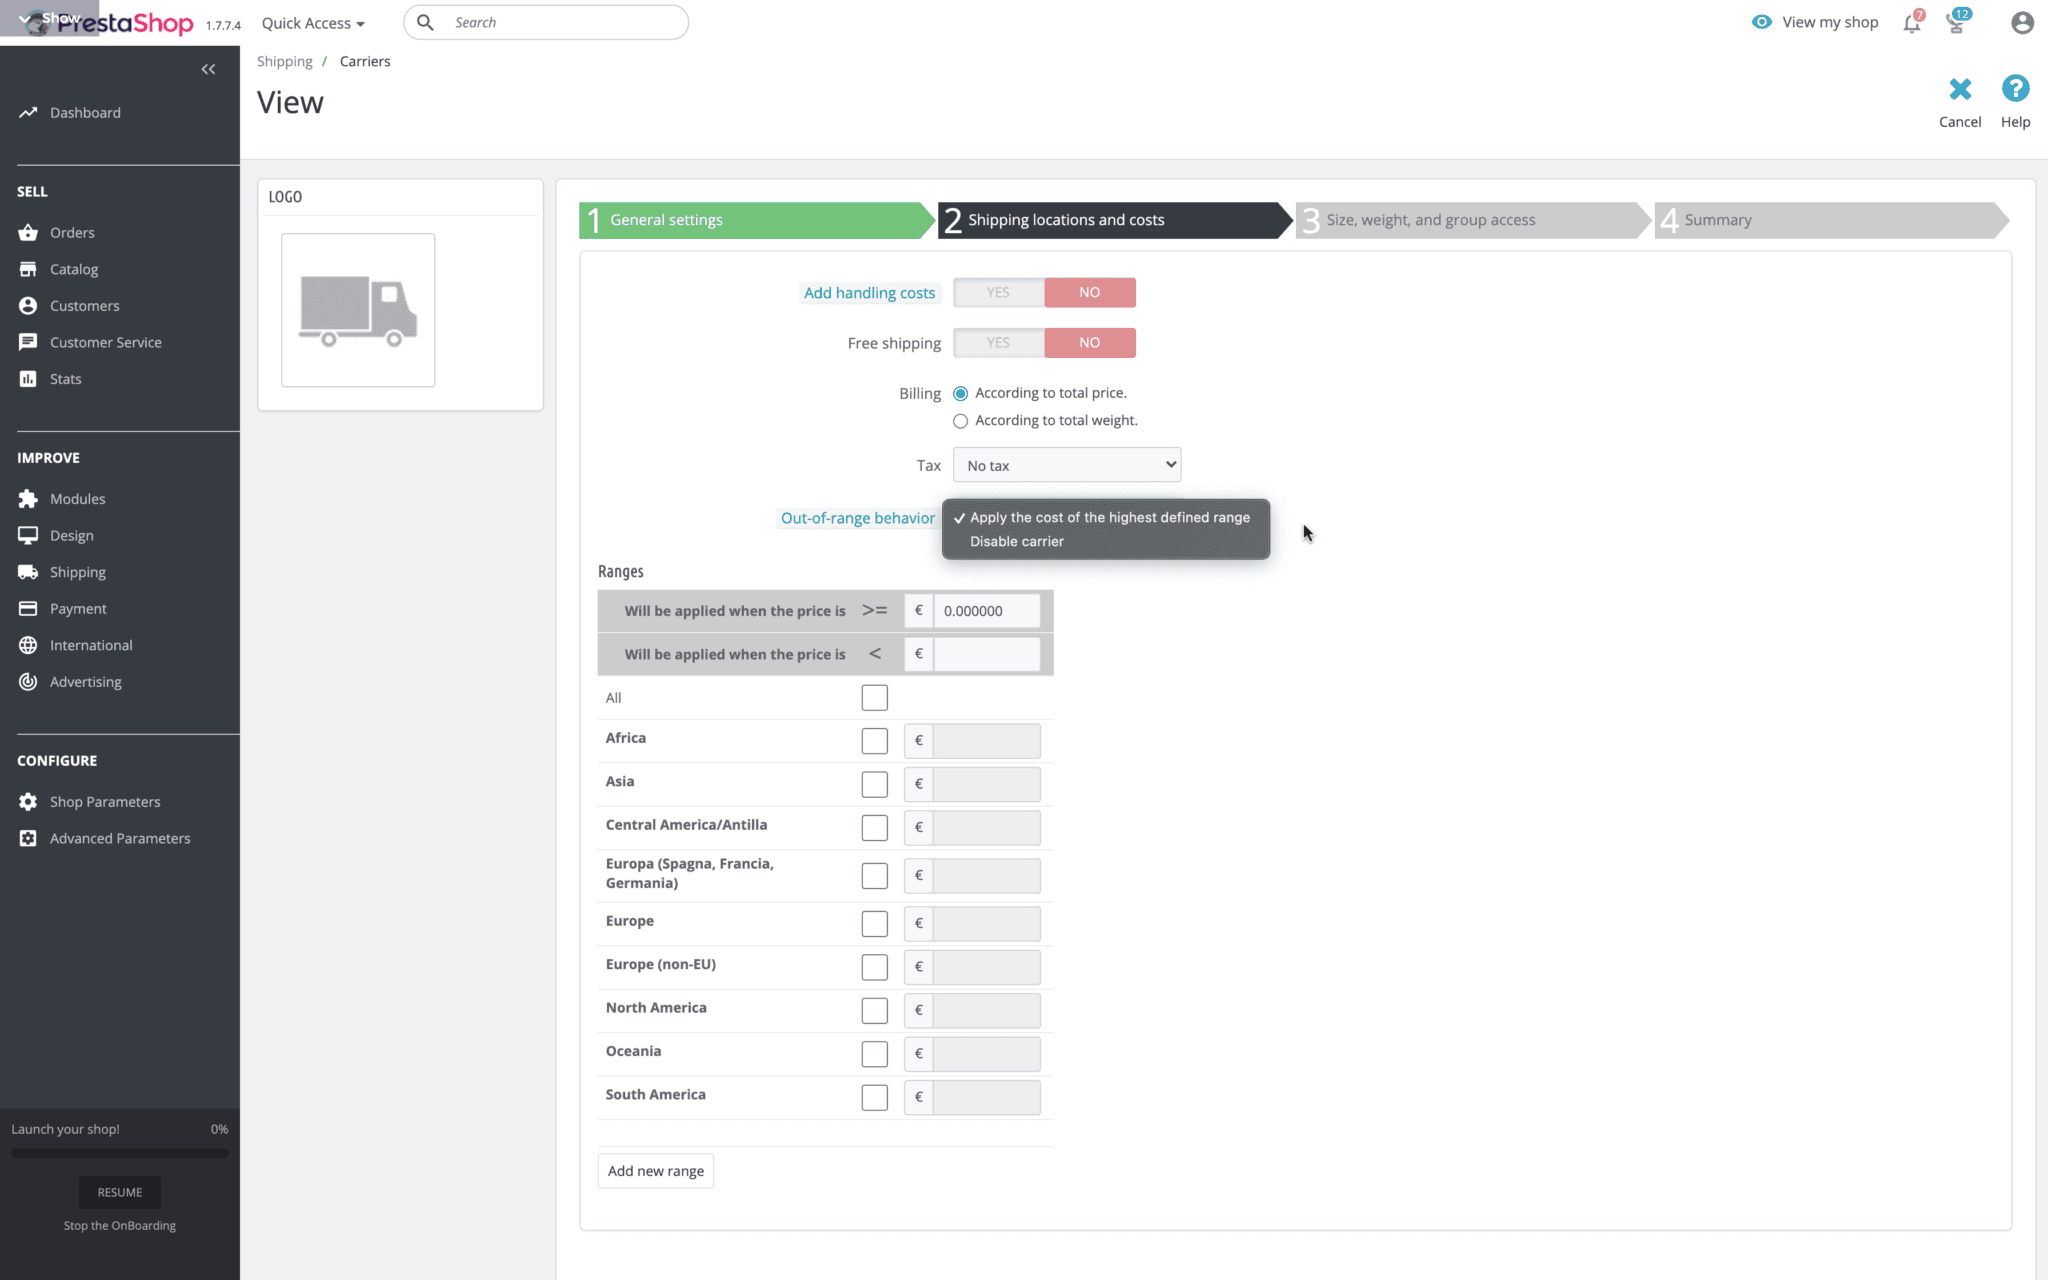
In that case you can choose between two options:
Apply the cost of the highest defined range — This option means that if the cart's value or weight exceeds the parameters you've set, PrestaShop applies the price of the highest range set.
Disable carrier — By enabling this option, if the price or weight of the cart exceeds the parameters you've set for this carrier, the carrier can no longer be selected by the customer at checkout.
Ranges
In this section you set the weight or price ranges, the zones for which this shipping method will be available, and the corresponding flat rates.
If you need to set more than one range, simply fill in the first range and then click "Add new range".
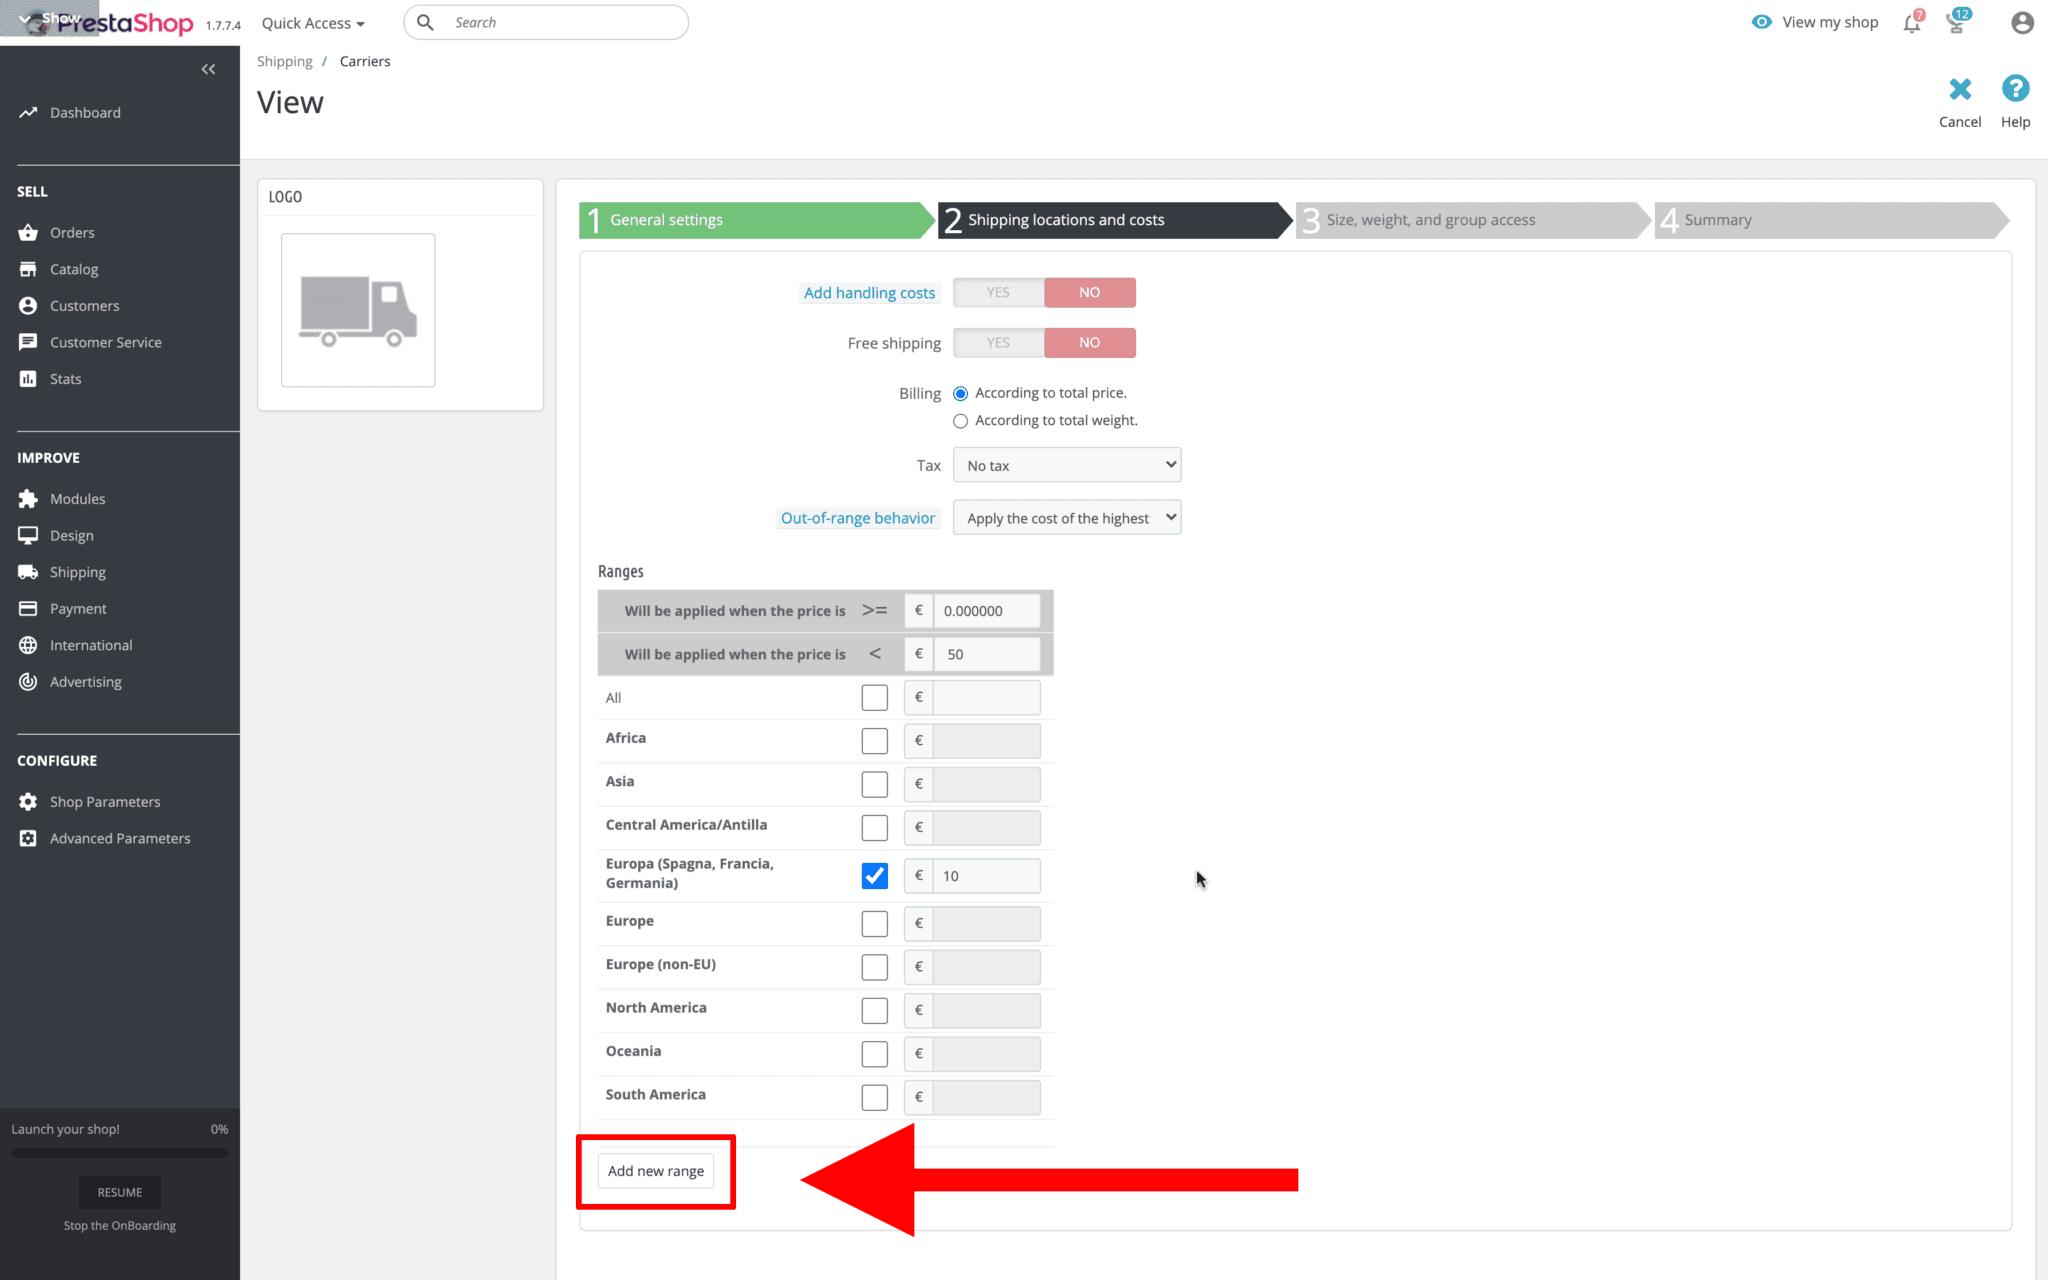
A second column will appear, letting you further expand the range and create additional price categories.
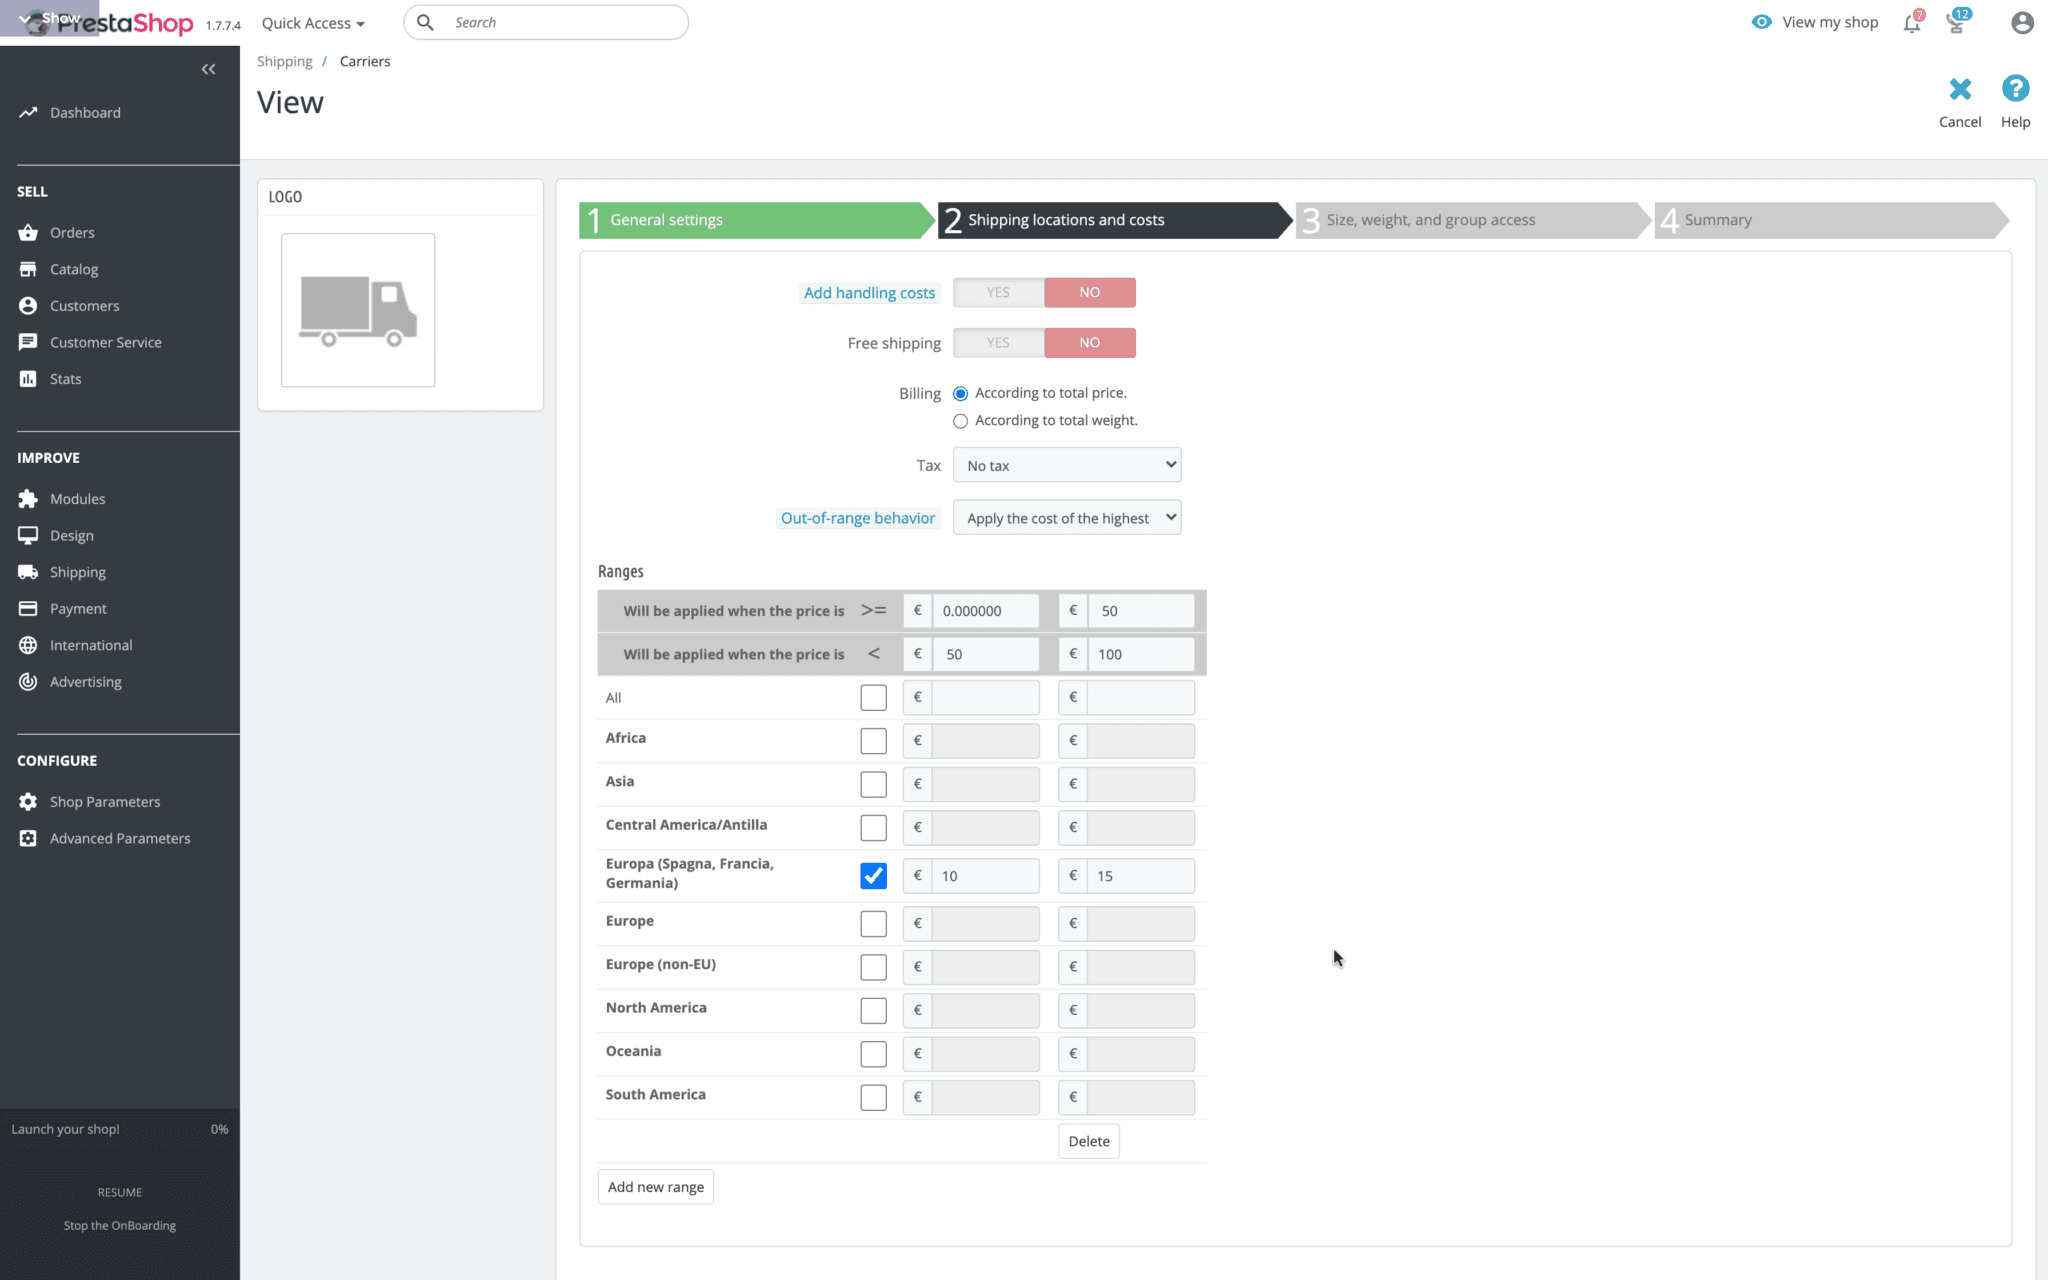
Once you've entered all the ranges you need, you can click "Next" and move on to the next section.
PrestaShop carriers: size, weight and access groups
In this section you can set the maximum dimensions and weight limits for this carrier.
If the carrier has no size or weight limits, you can leave this field blank and PrestaShop won't take it into account.
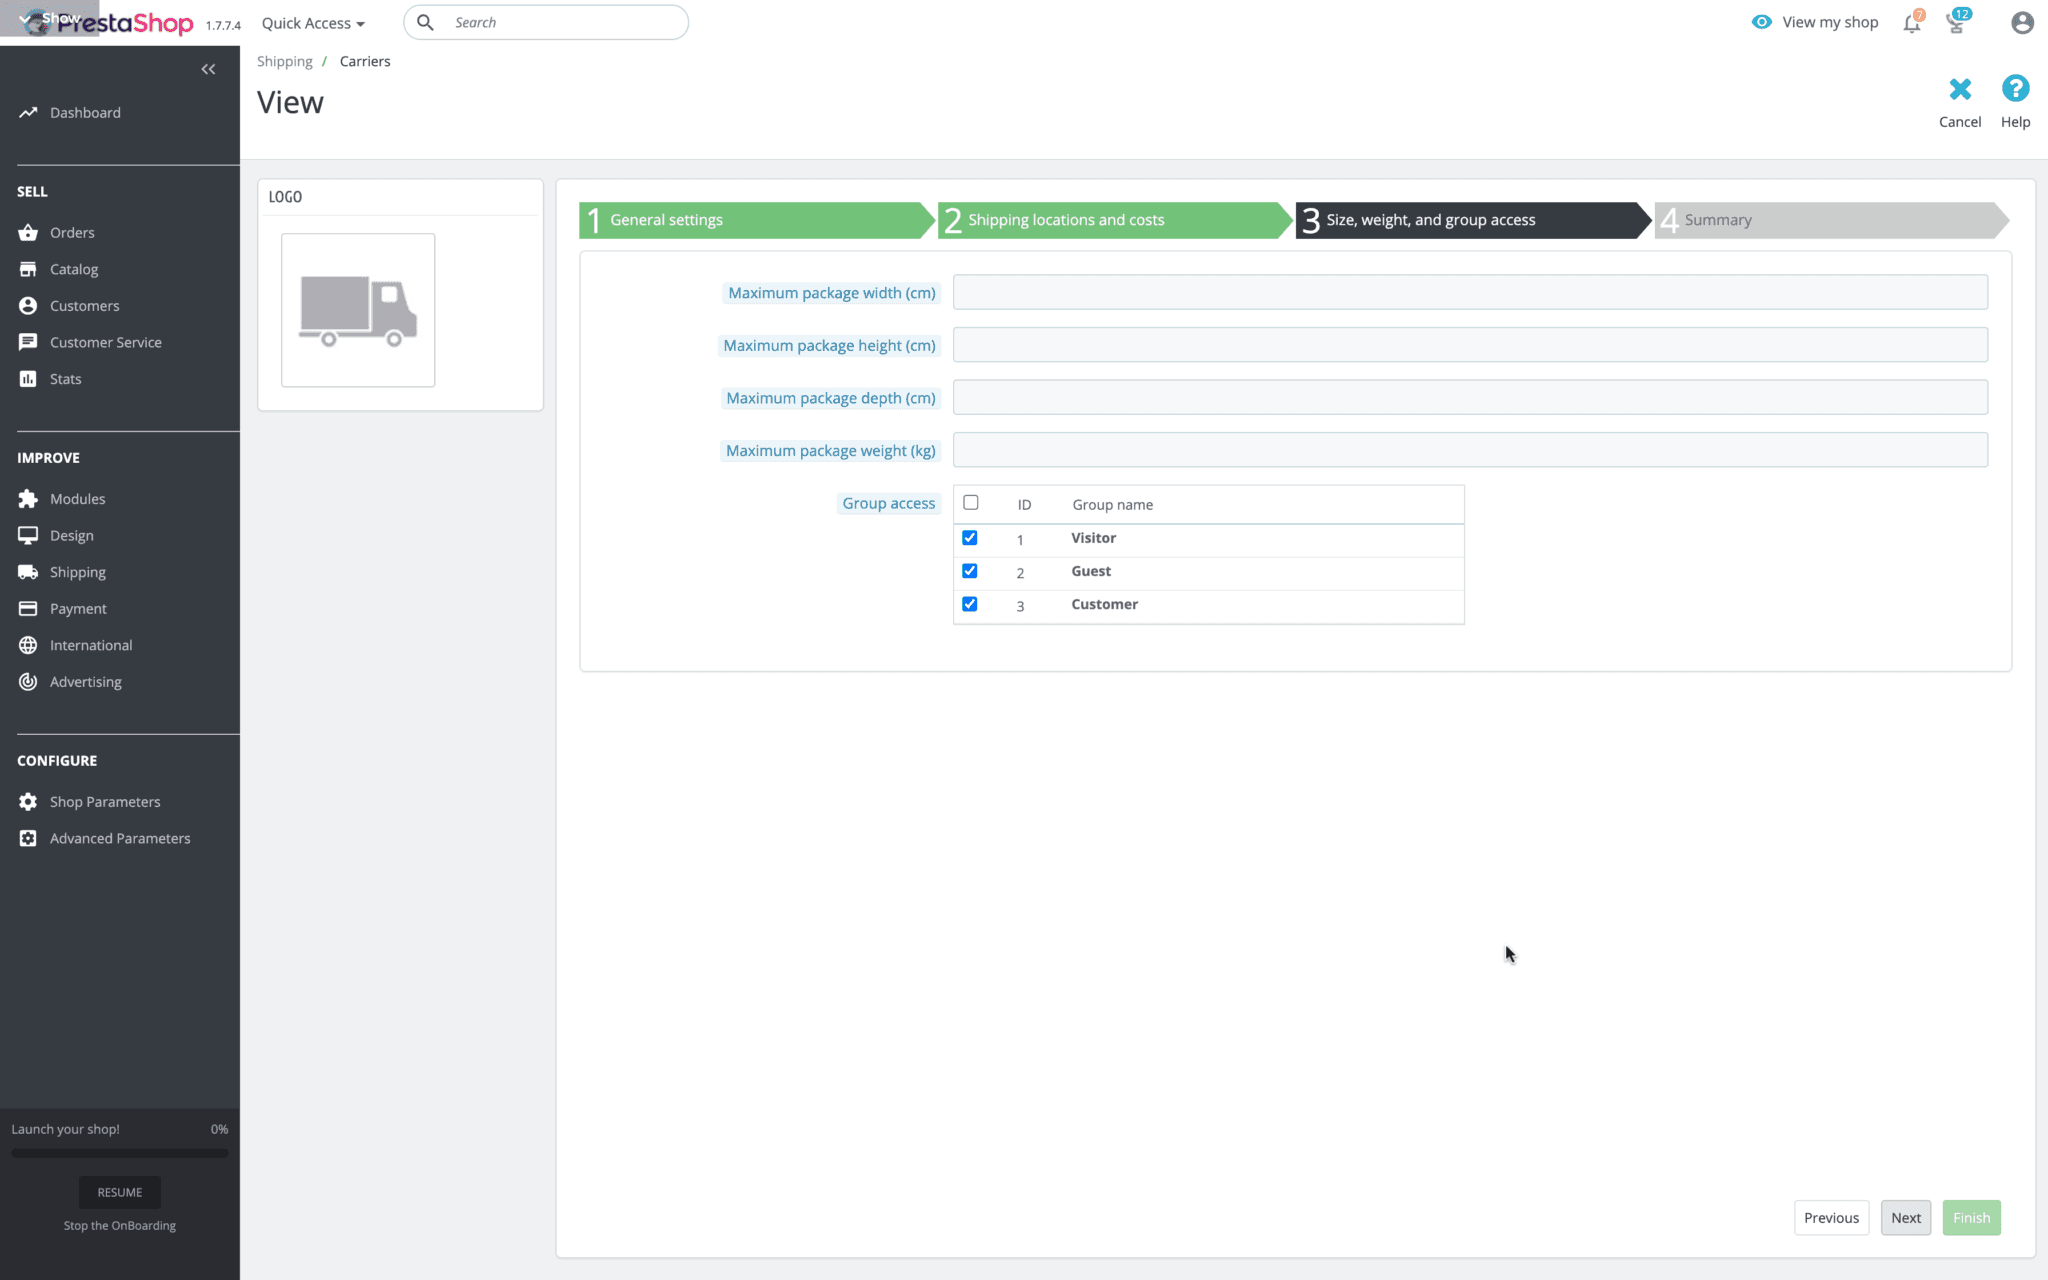
Another interesting feature you can access from this screen is group access.
Group access
This filter lets you make the carrier available to all site visitors or only to certain categories.
Visitor — This is a user who doesn't have a registered account.
Guest — These are customers who placed an order using a guest account (if you've enabled this feature).
Customer — This is a user who has registered a personal account.
Once you've configured all the parameters you're interested in, all that's left is to click "Next" and move on to the next screen.
PrestaShop carriers: summary
At the end of the whole process, PrestaShop lets you review all the data you've set up for the carrier and make any necessary corrections.
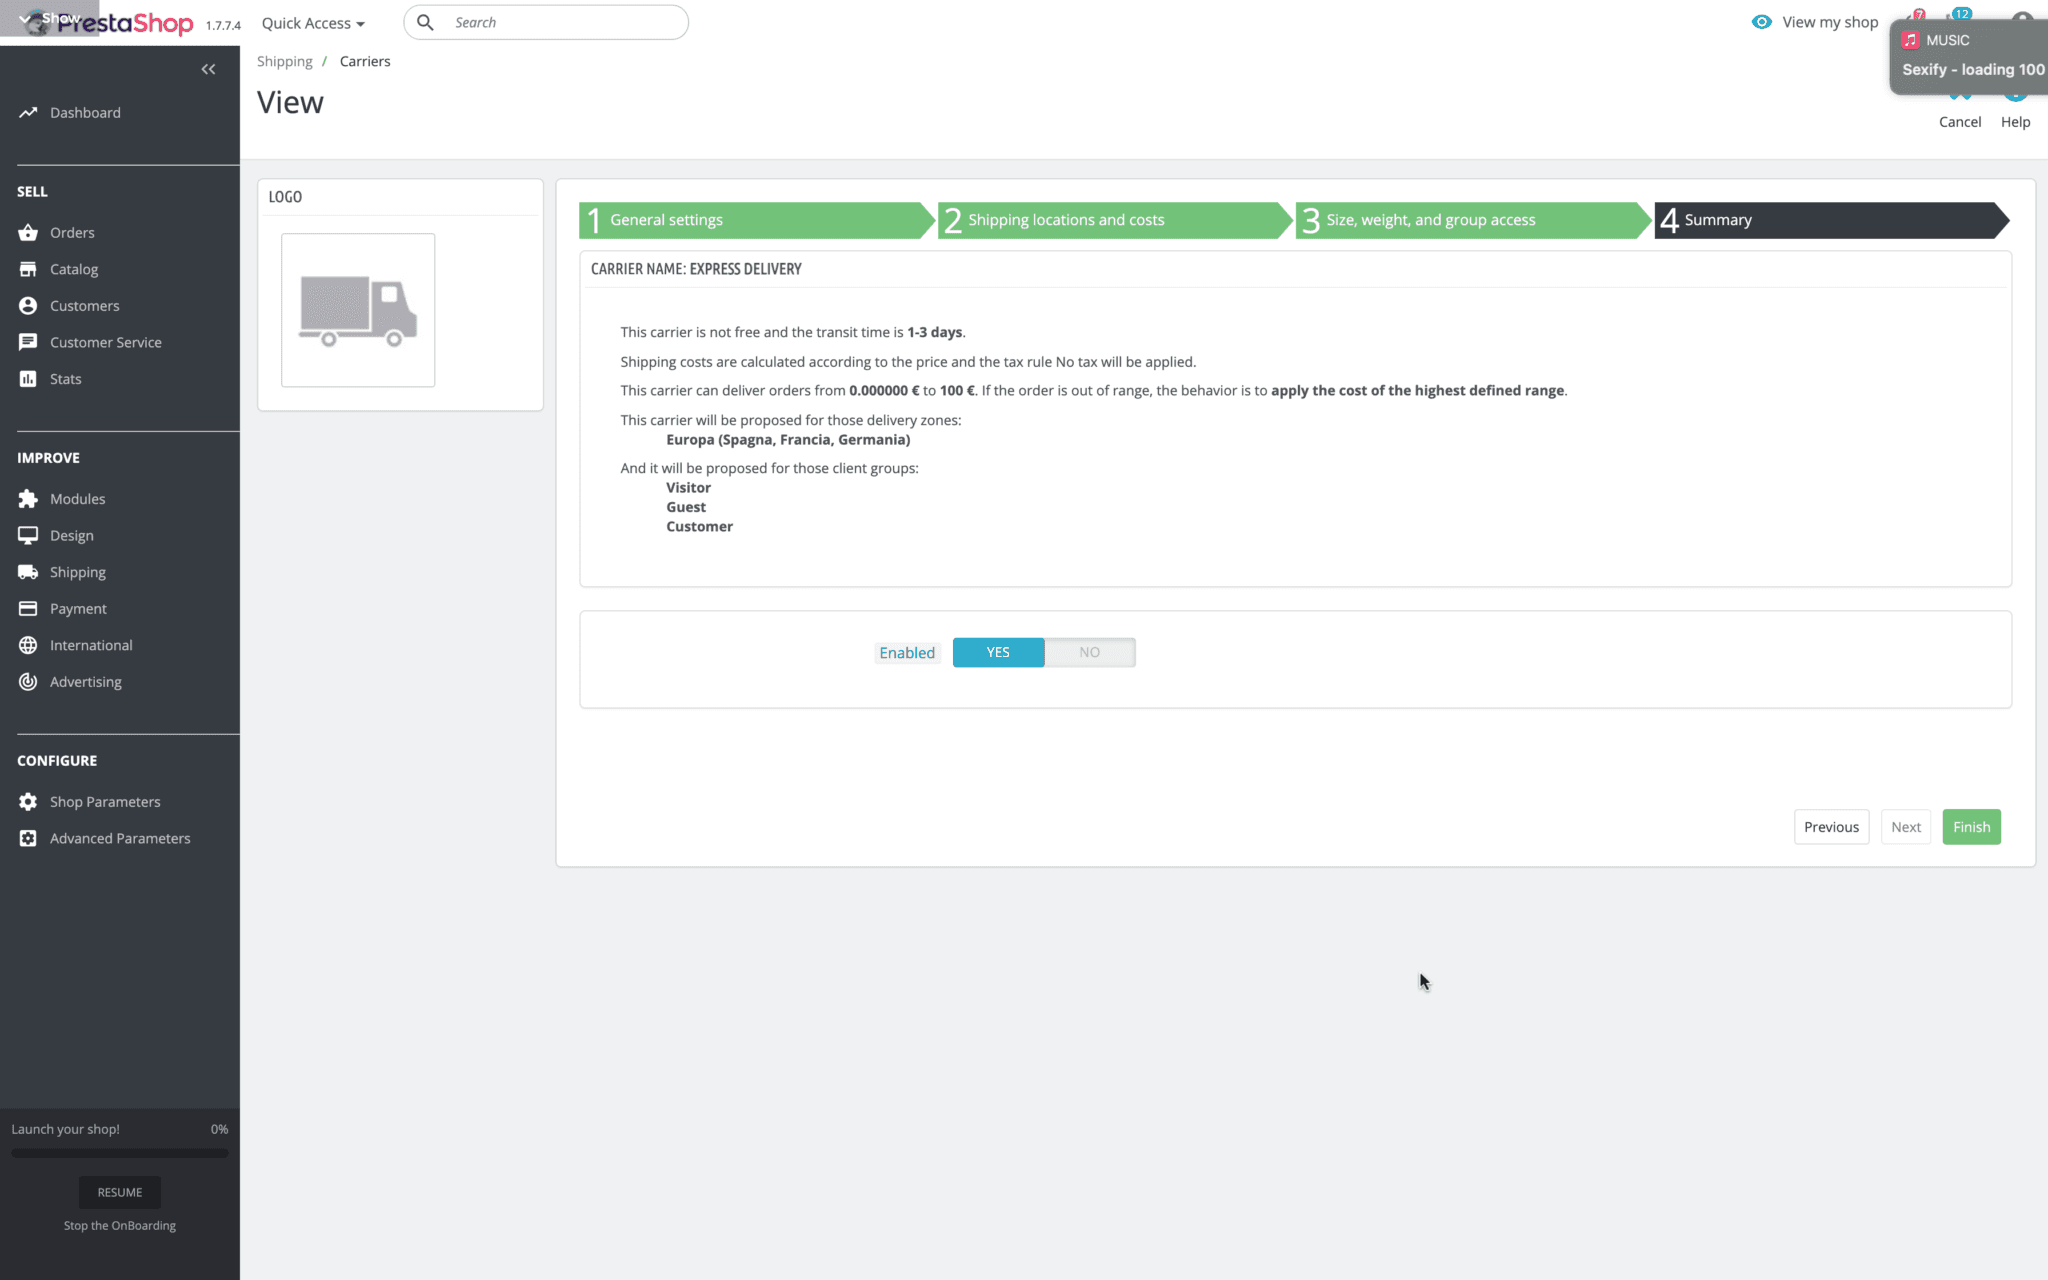
Enabled
If you want to create the carrier but don't want to make it available to your customers yet, just click "Enabled" > "No" and you can enable it later.
If everything looks right, just click Finish and you'll have created your carrier!
PrestaShop shipping: general settings
Now that we have a clearer picture of the logic behind how PrestaShop manages shipping methods, we can take a look at the general settings and see which parameters can be configured.
To access this section, simply click "Shipping" in the left-hand menu and then "Preferences".
Handling
Handling charges
Free shipping starts at €
Free shipping starts at kg
If you have fixed handling costs for packages (e.g. packaging) that you want to apply to all shipments, this is the place to set them.
The same goes for free shipping. If you have weight or cart value ranges that are the same for all products, you can set them here and they'll be automatically applied to all shipments.
Carrier Options
Default carrier — Once you've set up all your carriers (as we saw in the previous section of this article), here you can select the default carrier for all shipments.
Sort by — This option lets you choose the criteria by which the available carriers are listed to customers at checkout. There are two options:
Price: sorts the options by price
Position: uses the order in which carriers are listed on the relevant PrestaShop screen. You can easily change the order manually.
Order by
This option lets you choose between ascending or descending order (by price or position)
Once you've made the changes you need, remember to save! (It can never be said too often.)
PrestaShop shipping: carrier modules
One of the great advantages of PrestaShop is that it's an open source platform. This doesn't just mean that PrestaShop is completely free (which is already good news), but that it's very easy for third parties to develop software for the platform.
Do you know what that means?
That every carrier has its own extension.
As a result, (technically) it's possible to calculate shipping in real time, print labels directly, send tracking data and manage returns… all directly within PrestaShop.
In practice, it all depends on how much complexity each carrier has decided to build into its own module.
Some of the available modules are free, others come at a cost (because they're developed by third parties).
Free modules
GLS
DHL
Poste Italiane
Paid third-party modules
BRT
FedEx
TNT
UPS
SDA
The cost of the modules varies, ranging from "definitely expensive" (as with BRT and SDA) to "fairly pricey".
These aren't prohibitive costs if you only need to buy one module, but if you're planning to use several carriers, the expense can add up pretty quickly. Especially if you're just starting out.
PrestaShop shipping: the complete Sendcloud solution
The good news is that the Sendcloud module is free… and does the job of all the other modules combined.
I know it sounds crazy, but that's exactly how our service works.
We take charge of all the logistics for your e-commerce store and take care of finding the most convenient carrier and rate, while guaranteeing the best possible experience for your customers.
Why do we do this?
Because service quality is the most important element of a successful e-commerce store.
If you don't have to worry about logistics, you can guarantee your customers the best possible shopping experience.
And since our only concern is getting your goods to their destination, you can be sure we're not thinking about anything else.
We currently manage logistics for more than 15,000 successful e-commerce stores around the world, and we help new partners every day.
Would you like to know more?
Request a demo of our services and talk about your needs with one of our experts. We're always happy to help!
Or, if you're the hands-on type, put us to the test and try Sendcloud right away.
If you'd like to find out more about other e-commerce platforms besides PrestaShop, we recommend checking out our articles:
WooCommerce shipping: how to set it up in full
The complete list of the best PrestaShop add-ons
WooCommerce apps: the top 40 most used
Which are the best Magento extensions for your store
Shopify apps: the definitive ranking
How to best set up shipping in Shopify
How much time can you save on shipping?

Share
Recommended for you

Shipping
Integrations
Best Shopify shipping apps: compare features, pricing & automation
Compare the best Shopify shipping apps for automation, carriers, labels, tracking, returns and international shipping. Find the right app for your store.

Shipping
Shopify shipping automation: How to automate your fulfillment workflow
Learn how Shopify shipping automation helps you automate fulfillment workflows, reduce shipping errors, save time, and scale with Sendcloud.

Shipping Intelligence
Shipping
E-commerce